What is ComfyUI? A Beginner's Guide to ComfyUI

If you've ever created AI images using "type prompt – click button" interfaces, sooner or later you'll want more control: changing models, combining LoRAs, upscaling, editing specific areas, or running the same process for hundreds of images. That's where ComfyUI shines.
This article is a from-scratch guide: what ComfyUI is, whether your computer can run it, how to install it, where to put models, what each "block" (node) in the default workflow does, and how to handle common beginner errors. All technical information is cross-referenced with official ComfyUI documentation (docs.comfy.org and the official GitHub repository) – a list of sources is at the end of the post. Since ComfyUI updates very quickly, if there are minor interface differences, please prioritize the official documentation.
1. What is ComfyUI?
ComfyUI is open-source software (GPL-3.0 license) for running generative AI models using a node-based graph interface. Instead of a fixed form with input fields, you "assemble" the image generation process from functional blocks and connect them with wires – much like drawing a flowchart.
Each node performs a specific task: loading a model, encoding a prompt, creating a "canvas," denoising, decoding the image, saving the file… The entire diagram is called a workflow.
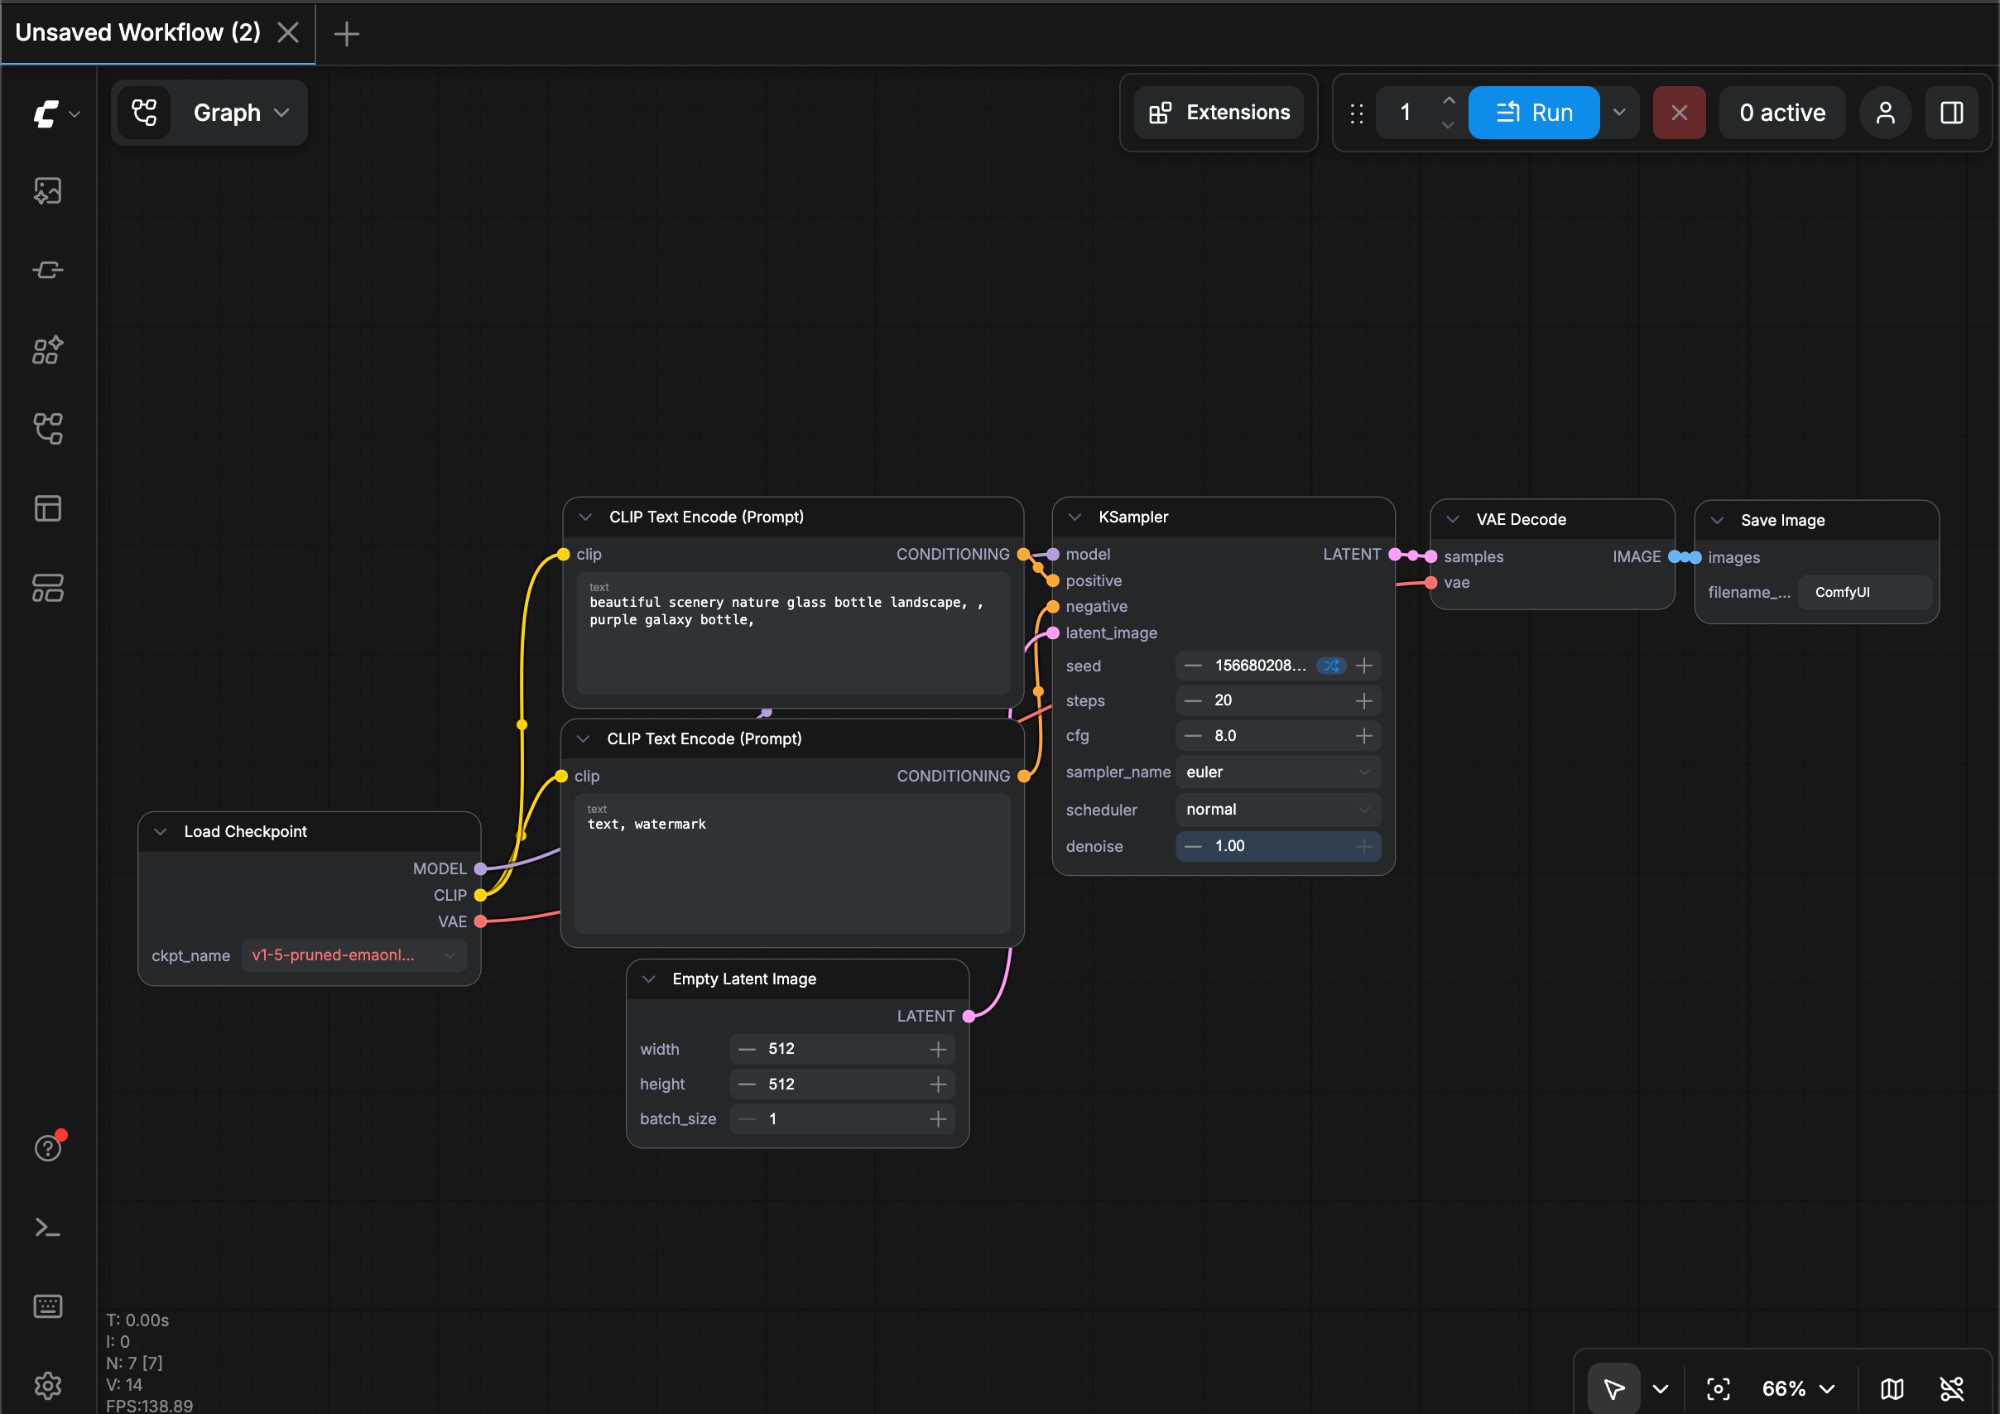 The ComfyUI interface with the default text-to-image workflow. Source: ComfyUI Docs – Getting Started (Comfy-Org/docs, GPL-3.0).
According to the official README, ComfyUI now supports workflows for not just images but also video, audio, 3D, and text, with many model families supported out of the box like Stable Diffusion 1.5, SDXL, SD3.5, Flux, Qwen Image, Z-Image (images) or Wan, LTX-Video, HunyuanVideo (video). ComfyUI runs on Windows, Linux, and macOS, or on the official Comfy Cloud service if you don't want to install it locally.
A few technical features worth knowing (per the README):
- Re-executes only changed parts: if you only edit the last node, ComfyUI only recalculates that node and its dependencies – saving a lot of time.
- Only branches with outputs and sufficient inputs will run. "Dangling" nodes that aren't connected to anything will be ignored.
- Workflows are embedded in PNG images generated by ComfyUI: dragging that image into the interface restores the entire workflow, including the seed.
2. Why Choose ComfyUI? (Short comparison with A1111/Forge)
Two other popular interfaces are AUTOMATIC1111 (A1111) and Forge (a fork of A1111). They use a tab/form-based interface, which is very easy to learn. A brief comparison:
| Criteria | ComfyUI | A1111 / Forge |
|---|---|---|
| Interface Style | Node graph, custom-built processes | Forms, tabs, buttons |
| Initial Ease of Use | Requires a few sessions to get used to | Easy from the start |
| Level of Control | Very high, every step is visible | Within the scope of built-in features |
| Reuse/Sharing | Save JSON files or PNG images containing workflows | Mostly sharing parameters |
| New Models | Often supported early via nodes/templates | Depends on individual project updates |
| Automation | Has a local API to integrate workflows into apps | Has an API but is less flexible |
You should use ComfyUI when: you want to understand the nature of the process, need complex workflows (multiple steps, multiple models), want to use the latest models, or plan to automate/integrate it into a product. If you only occasionally generate a few images, a form-based interface is still perfectly fine.
3. Can Your Computer Run ComfyUI?
According to the System Requirements page of the official documentation:
| Category | Official Information |
|---|---|
| Operating System | Windows, Linux, macOS (Apple Silicon – M chips) |
| NVIDIA GPU | Best support; install the CUDA version of PyTorch as instructed |
| AMD GPU | Linux via ROCm; Windows via AMD's multi-architecture PyTorch package (RDNA 2/3/3.5/4) |
| Intel GPU | Arc series, via PyTorch supporting torch.xpu |
| Apple Silicon | M1/M2/M3/M4, accelerated via Metal (MPS) |
| CPU Only | Can run with the --cpu parameter but is very slow |
| Python (Manual Install) | 3.13 is recommended; 3.12 is a fallback; 3.14 works but some custom nodes may error |
| Browser | Google Chrome 143 or higher recommended |
For Comfy Desktop on Windows, the documentation states: Windows 10 or later, x64 or ARM64 architecture, dedicated GPU (NVIDIA/AMD) recommended, and at least ~4.85 GB of space for each installation – excluding models. The troubleshooting page also advises leaving at least 15 GB free during installation.
Practical Advice: VRAM (video card memory) is the deciding factor for which models run smoothly. Beginners should start with Stable Diffusion 1.5 – a lightweight model (~4 GB according to docs) that runs well at 512×512 on consumer GPUs. Larger models like SDXL or Flux require more VRAM; check specific requirements on each model's page. If VRAM is low, there is a --lowvram parameter (see the common errors section).
4. Installing ComfyUI: Choose 1 of 3 Methods
| Installation Method | Best For | Pros | Notes |
|---|---|---|---|
| Comfy Desktop | Most beginners (Windows, macOS Apple Silicon, Linux) | Installs like regular software, includes ComfyUI-Manager, auto-updates | Follows the Stable channel (can switch to "Latest on GitHub") |
| Windows Portable | Windows users wanting the latest version, "extract and run" | Includes its own Python, doesn't touch system settings | Windows only; README states it's not recommended for general users |
| Manual Install (Git) | Users comfortable with command lines, Linux, AMD/Intel GPUs… | Supports all OS and GPU types, full control | Manually manage Python, PyTorch, and virtual environments |
Method 1 – Comfy Desktop (Recommended for Beginners)
The official README clearly states: the desktop app is the easiest and best way for new users.
- Go to the official download page comfy.org/download – the page auto-detects your OS.
- On Windows: run the
.exeinstaller and follow the instructions. On macOS: use the Apple Silicon version. On Linux: AppImage and.debpackages are available. - Open Comfy Desktop. On the first run, the app will ask if you want to run on Comfy Cloud or install locally – choose local installation if you want to use your own GPU.
- Wait for the app to create the ComfyUI installation, after which the node interface will appear.
The Desktop version comes with ComfyUI-Manager pre-installed and automatically checks for updates (a "Desktop Update Ready" button will appear when a new version is available).
Method 2 – Windows Portable
- Download the appropriate
.7zfile from the official GitHub Releases page: there are versions for NVIDIA, AMD, and Intel. The standard NVIDIA version supports RTX 20 series and newer; GTX 10 series and older cards must use the specific version withcu126in the name. - Extract using 7-Zip (or the built-in Windows extractor on newer versions). If extraction fails: right-click the file → Properties → check Unblock.
- Run the
.batstartup file in the extracted folder (for NVIDIA cards, it's the GPU-run file), and your browser will open the ComfyUI interface. - If it fails to start: update your NVIDIA drivers – the portable version currently ships with Python 3.13 and PyTorch CUDA 13.0, which require modern drivers.
Method 3 – Manual Installation via Git (Windows, Linux)
For those comfortable with the command line. Steps per the README:
# 1. Download source code
git clone https://github.com/Comfy-Org/ComfyUI.git
cd ComfyUI

# 2. Create and activate a virtual environment (recommended)
python -m venv venv
source venv/bin/activate        # Windows: venv\Scripts\activate

# 3. Install PyTorch based on your GPU – e.g., NVIDIA (command from official README)
pip install torch torchvision torchaudio --extra-index-url https://download.pytorch.org/whl/cu130

# 4. Install dependencies
pip install -r requirements.txt

# 5. Run
python main.py
For AMD, Intel, Apple Silicon GPUs or other devices, the PyTorch installation command differs – copy the correct command from the Manual Install section of the README. After running, open your browser to the address shown in the command window (default is localhost, port 8188).
Note: ComfyUI does not have an official Docker image; images on Docker Hub are community-maintained.
5. Downloading Models and Placing Them in the Correct Folders
Most ComfyUI installations do not include models. When you open the default workflow without a model, ComfyUI will warn you about the missing model and show the filename with a download link.
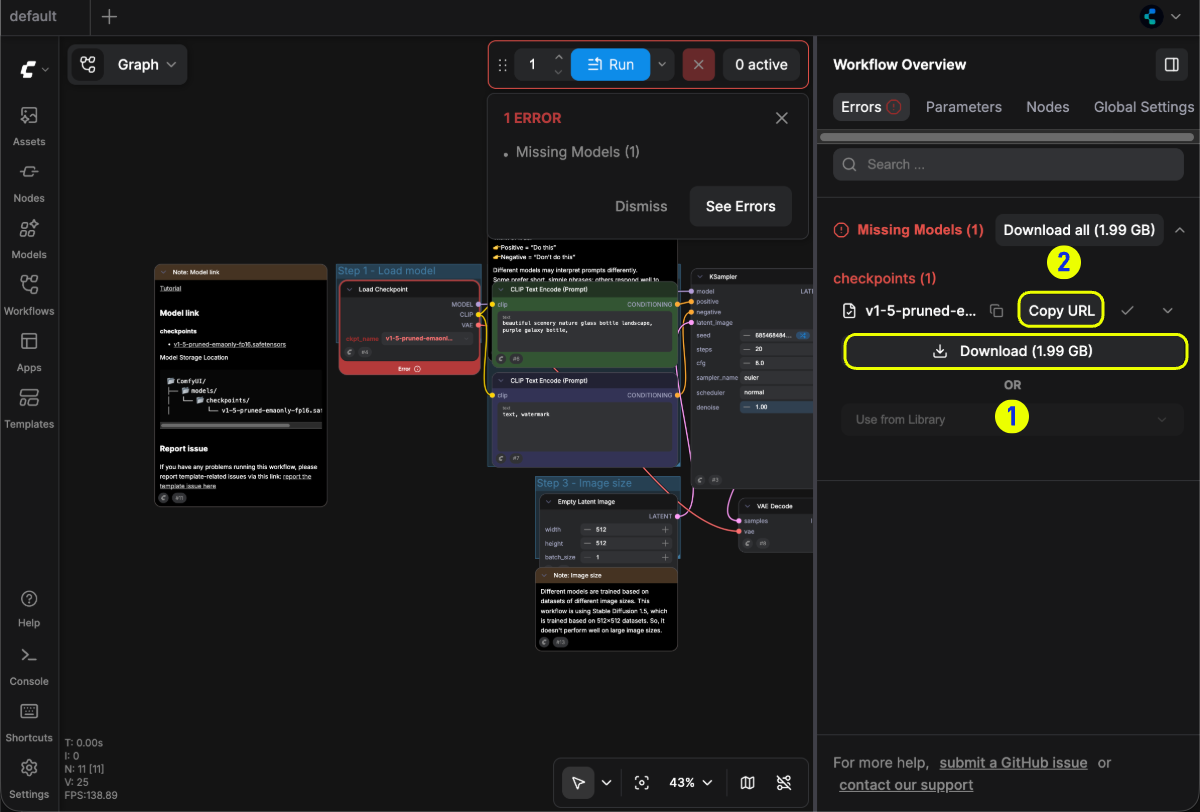 ComfyUI reporting a missing model with a download link. Source: ComfyUI Docs – Getting Started (Comfy-Org/docs, GPL-3.0).
The model for the first practice session in the official documentation is v1-5-pruned-emaonly-fp16.safetensors (Stable Diffusion 1.5), downloadable at Hugging Face – Comfy-Org.
- Desktop Version: click Download in the dialog; the app will automatically download and place it in the
models/checkpointsfolder. You can view the model folder path in the capsule menu at the top → Storage tab. - Portable Version: download the file via your browser; copy it to
ComfyUI_windows_portable/ComfyUI/models/checkpoints. - Manual Install: copy it to
ComfyUI/models/checkpoints.
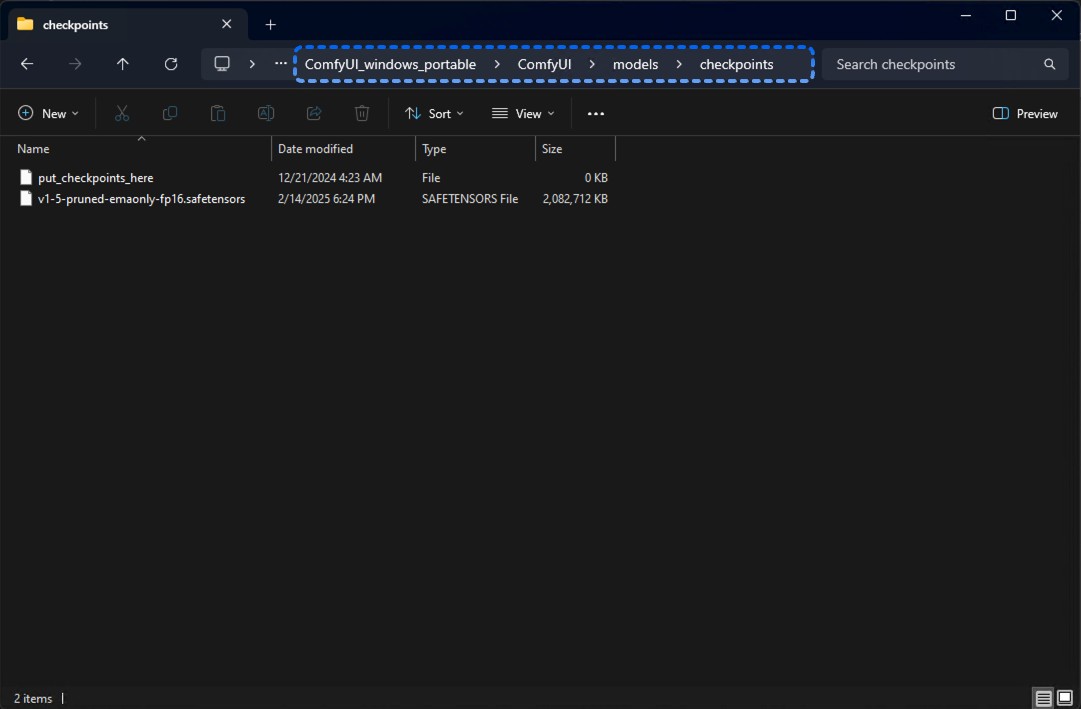 Checkpoint storage location on the Portable version. Source: ComfyUI Docs – Getting Started (Comfy-Org/docs, GPL-3.0).
Commonly used model directories (inside ComfyUI/models/):
| File Type | Folder | Notes |
|---|---|---|
Checkpoint (Main model .safetensors/.ckpt) |
checkpoints |
Largest files, contains model + CLIP + VAE |
| Standalone VAE | vae |
Per README |
| LoRA | loras |
See Difference between LoRA and Checkpoint |
| Embedding / Textual Inversion | embeddings |
Called in prompt using embedding:filename |
| Upscale Models | upscale_models |
Used with upscale nodes |
| TAESD Preview Decoder | vae_approx |
For high-quality previews |
Modern models (Flux, Qwen Image, video models…) often consist of multiple files placed in different folders – the README reminds you to follow each model's specific instructions. The safest way for beginners is to open the official template for that model: the template clearly states which files are needed and where to put them.
Sharing models with other software: if you already have models in an A1111/Forge folder, rename the extra_model_paths.yaml.example file in the ComfyUI directory to extra_model_paths.yaml and define the paths – no need to duplicate tens of GBs.
After adding models, press the R key in the interface to refresh the list (or restart ComfyUI).
6. Understanding the Default Workflow: What Does Each Node Do?
The default text-to-image workflow consists of 7 nodes. Think of it like this (as the official docs do): you give a request (prompt) to an artist (model), the artist draws on a canvas (latent), and then the drawing is "developed" into a file you can view.
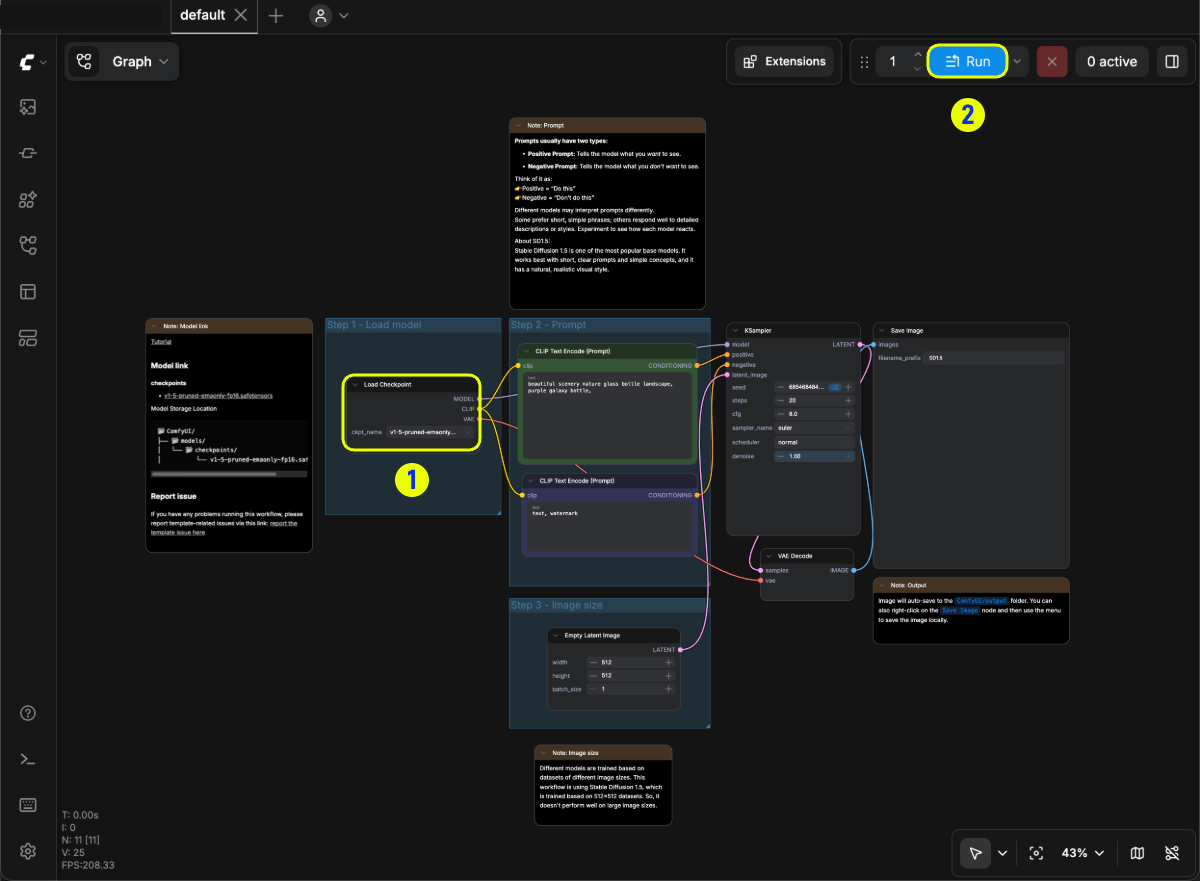 Official text-to-image template: (1) select model in Load Checkpoint, (2) click Run. Source: ComfyUI Docs – Getting Started (Comfy-Org/docs, GPL-3.0).
Load Checkpoint – Loading the Model
Loads the checkpoint file you select in the ckpt_name box. A checkpoint usually consists of 3 components, corresponding to 3 outputs:
- MODEL – the diffusion network (UNet) that predicts and removes noise.
- CLIP – the text encoder that turns your prompt into vectors the model understands.
- VAE – the converter between real image space (pixels) and latent space.
CLIP Text Encode (Prompt) – Two Nodes
Encodes the prompt using CLIP. There are two nodes: one connects to the positive port of the KSampler (what you want to see), and one connects to the negative port (what you don't want, e.g., text, watermark, blurry). The text color in the box doesn't determine which node is positive – the wiring does.
Empty Latent Image – The Canvas
Creates a "canvas" of pure noise in latent space. Three parameters: width, height (image size, default 512×512) and batch_size (number of images per run, default 1). SD1.5 was trained at 512×512, so it gives the best results at this size; setting it too large can cause repeated details or distortion.
KSampler – The Heart of the Workflow
This is where the step-by-step denoising process happens to "reveal" the image. Key parameters:
| Parameter | Meaning | Workflow Default | Suggestion for Beginners |
|---|---|---|---|
seed |
Random noise initialization number | Random number | Keep the seed fixed to reproduce the exact same image |
control_after_generate |
How the seed changes after each run (fixed, increment, decrement, random) | randomize | Choose fixed when fine-tuning a prompt |
steps |
Number of denoising steps | 20 | More steps = more detail but slower |
cfg |
Prompt adherence level | 8.0 | Too high can cause harsh colors or "deep-fried" looks |
sampler_name |
Sampling algorithm | euler | Change this once you're more experienced |
scheduler |
How noise levels are distributed across steps | normal | Try karras for comparison |
denoise |
Denoising strength (0–1) | 1.00 | Text-to-image: leave at 1.0; Image-to-image: lower it to keep the original image |
KSampler's four input ports: model (from Load Checkpoint), positive and negative (from the two CLIP Text Encode nodes), latent_image (from Empty Latent Image).
VAE Decode – "Developing the Image"
Converts the latent image created by KSampler into a real pixel image using the VAE from Load Checkpoint.
Save Image – Saving the Image
Displays and saves the image to the ComfyUI/output folder. The filename_prefix box sets the filename prefix. Saved images contain the workflow in their metadata.
Diagram Reading Tip: wire colors and port dots correspond to data types (MODEL, CLIP, VAE, CONDITIONING, LATENT, IMAGE). You can only connect two ports of the same type – if you drag a wire and it doesn't "stick," it's the wrong type.
7. Creating Your First Image – Step by Step
- Open the default workflow. ComfyUI usually loads it automatically on startup. If not, open the left sidebar → Templates and select the basic text-to-image template, or press
Ctrl + Dto load the default graph.
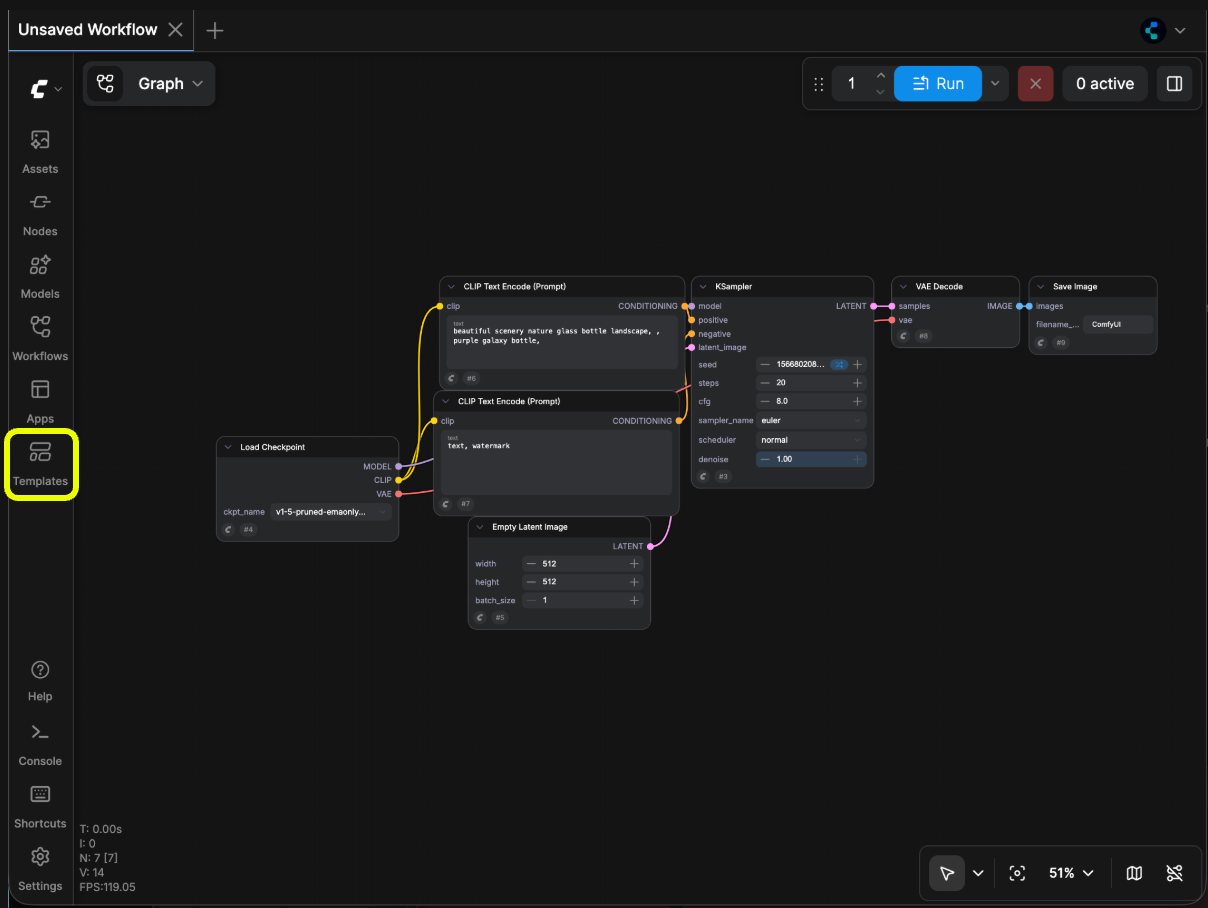 The Templates button on the left sidebar opens the official sample workflow library. Source: ComfyUI Docs – Getting Started (Comfy-Org/docs, GPL-3.0).
- Select a model in the Load Checkpoint node: ensure it shows
v1-5-pruned-emaonly-fp16.safetensors, notnull. - Write a prompt in the CLIP Text Encode node connected to positive. For SD1.5, official docs advise: use English, separate with commas, use short phrases instead of long sentences, and be specific. Example:
Negative:a glass bottle with a purple galaxy inside, on a wooden table, garden background, soft daylight, highly detailedtext, watermark, blurry, low quality. - Click Run (or
Ctrl + Enter). A progress bar will appear on the currently running node. - View the result in the Save Image node and in the Media Assets panel on the left. Images are automatically saved to
ComfyUI/output; right-click to save additional copies.
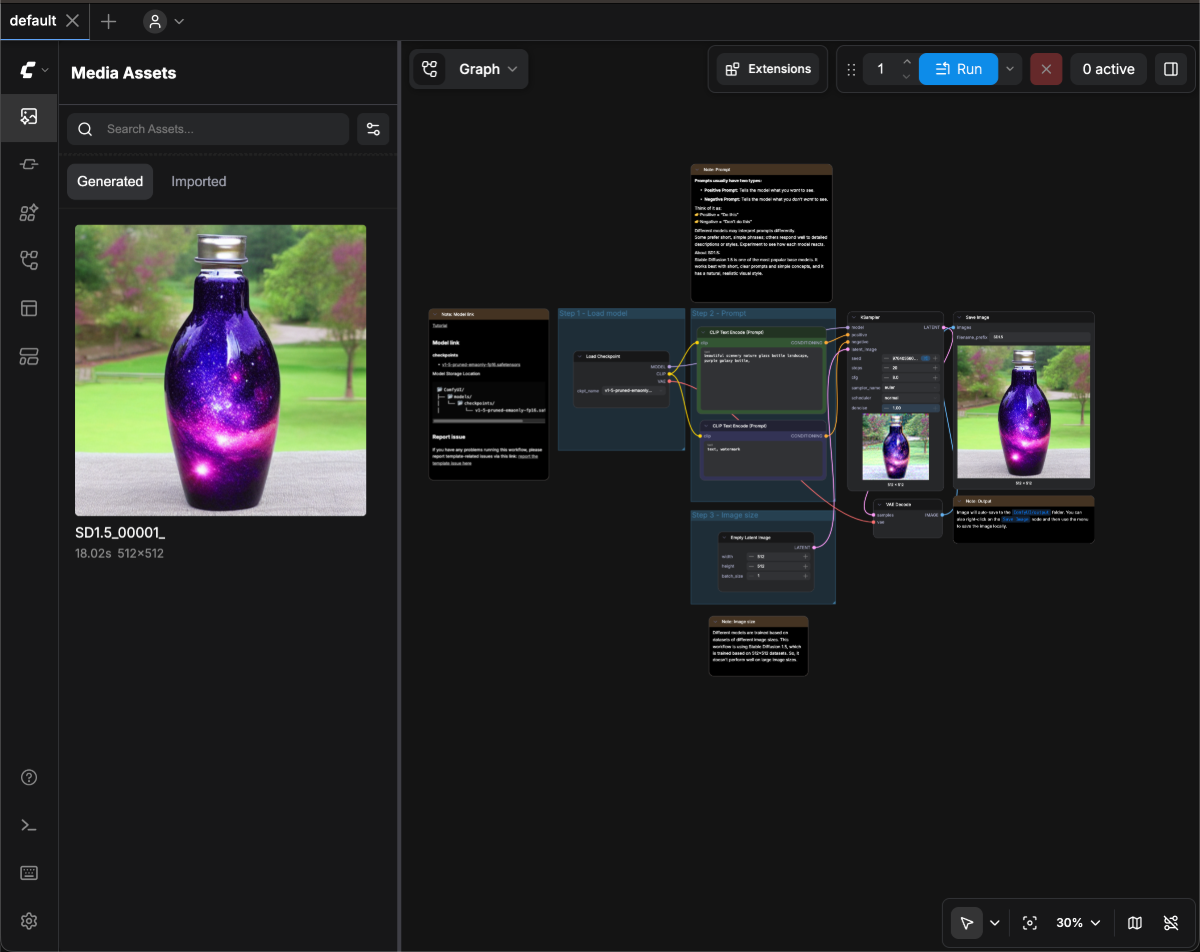 Result of the first generation (512×512) displayed in Save Image and Media Assets. Source: ComfyUI Docs – Getting Started (Comfy-Org/docs, GPL-3.0).
Further Experimentation:
- Increase the weight of a phrase using the syntax
(golden hour:1.2); decrease it with(text:0.8). Parentheses without a number default to ×1.1. - Random prompts:
{day|night}will be replaced randomly with "day" or "night" each run. - Set
control_after_generate= fixed, then change only one factor at a time (prompt, cfg, sampler) to see the impact clearly.
To write better prompts, see our article on How to write effective AI image prompts.
8. Useful Shortcuts
According to the official README (on macOS, replace Ctrl with Cmd):
| Shortcut | Action |
|---|---|
Ctrl + Enter |
Queue the workflow to run |
Ctrl + Shift + Enter |
Queue to the front of the line |
Ctrl + Alt + Enter |
Cancel the current run |
Ctrl + Z / Ctrl + Y |
Undo / Redo |
Ctrl + S / Ctrl + O |
Save / Open workflow |
Ctrl + D |
Load default graph |
Ctrl + B |
Bypass node (skips it as if deleted, wires connect through) |
Ctrl + M |
Mute/unmute node |
Ctrl + G |
Group selected nodes |
Alt + C |
Collapse/expand node |
Hold Space + drag |
Pan the workspace |
Ctrl + C then Ctrl + Shift + V |
Paste nodes keeping input wires |
R |
Refresh model/node list |
Also: double-click an empty area to open a search box to find nodes by name – the fastest way to add nodes.
9. ComfyUI-Manager and Custom Nodes
Custom nodes are nodes written by the community (e.g., advanced ControlNet, face processing, upscaling…). ComfyUI-Manager is a tool that helps you install, update, uninstall, enable/disable custom nodes, download models, save "snapshots" of your installation state, and specifically detect missing nodes when you open someone else's workflow.
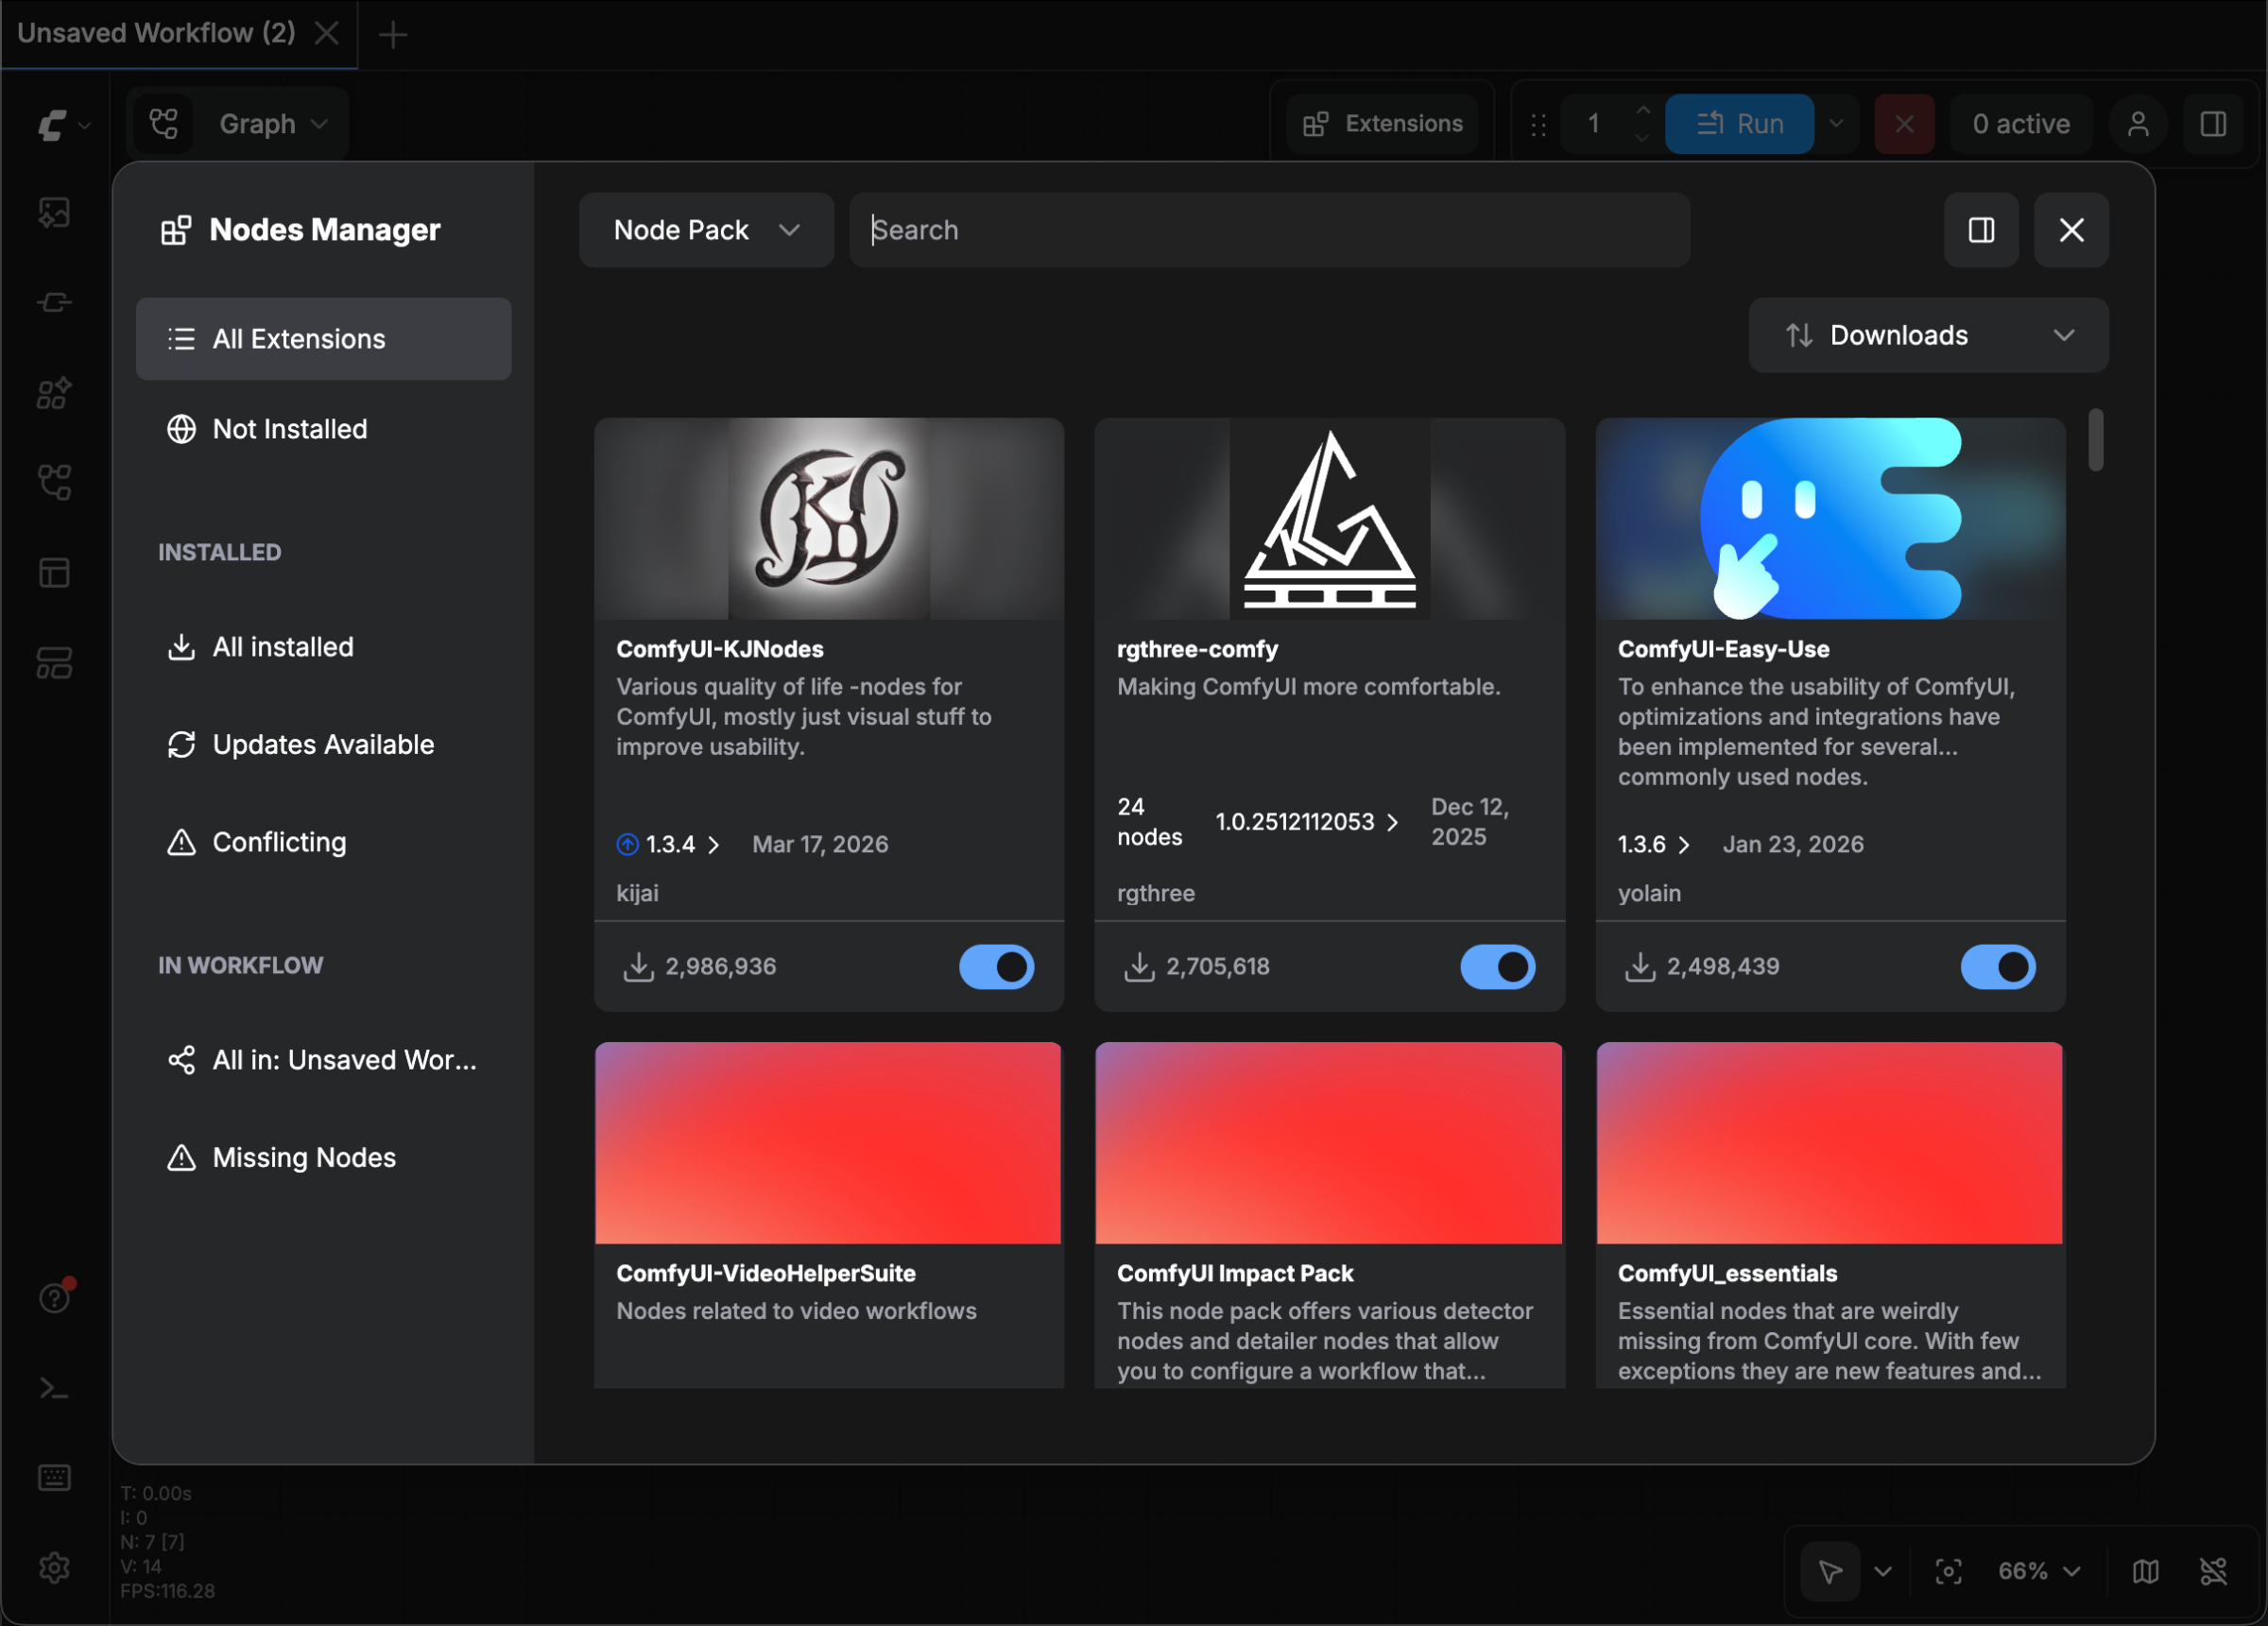 The new ComfyUI-Manager interface. Source: ComfyUI Docs – ComfyUI-Manager (Comfy-Org/docs, GPL-3.0).
How to enable it according to official docs:
- Comfy Desktop: Pre-installed and enabled (
--enable-manager), no action needed. - Windows Portable: Manager is in the ComfyUI core but needs activation. In the portable folder, run:
.\python_embeded\python.exe -m pip install -r ComfyUI\manager_requirements.txt .\python_embeded\python.exe -s ComfyUI\main.py --windows-standalone-build --enable-manager - Manual Install: Activate your virtual environment, run
pip install -r manager_requirements.txt, then start withpython main.py --enable-manager.
Safety rules for custom nodes: custom nodes are Python code running on your machine. Only install popular nodes from clear sources; install them one by one and check after each; if ComfyUI errors after a new node install, disable that node first. The Desktop version also has Manager security levels (Strict/Standard/Relaxed/Permissive) – we recommend keeping it at Standard.
10. Saving, Opening, and Sharing Workflows
- Save:
Ctrl + Sor menu Workflows → Save. To get a file to send to others: Workflows → Export as a JSON file. - Open:
Ctrl + O/ Workflows → Open, or drag and drop a JSON file into the interface. - From PNG images: every image created by ComfyUI has the workflow embedded in its metadata. Dragging the image into ComfyUI restores the entire process, including the seed. This is a very fast way to learn: download sample images from the official examples page and drag them in to see how they built the workflow.
- Note on sharing: many social media platforms and chat apps strip metadata or compress images upon upload, losing the workflow. To share reliably, send the JSON file or the original PNG file.
- Official Templates: a library of samples is at comfy.org/workflows and under the Templates button – the best starting point for new models.
11. Common Errors and Solutions
| Symptom | Common Cause | Solution |
|---|---|---|
ckpt_name shows null / no models |
File in wrong folder or not refreshed | Check models/checkpoints, press R or restart |
| Opening workflow shows red nodes / missing nodes | Workflow uses custom nodes you haven't installed | Use ComfyUI-Manager → Install Missing Custom Nodes, then restart |
| "Prompt execution failed" dialog | Various causes | Click Show report to read the specific error; check models and custom nodes |
| Out of memory (OOM), running very slow | Image/batch too large, insufficient VRAM | Reduce resolution and batch_size, close other GPU apps, try --lowvram |
| Portable version won't start | Old NVIDIA drivers | Update drivers; GTX 10 series and older use the cu126 version |
| "Torch not compiled with CUDA enabled" error (manual install) | Installed CPU version of PyTorch | pip uninstall torch then reinstall using the correct GPU command |
| ComfyUI breaks after installing a custom node | Node library conflict | Disable the new node (Manager or remove from custom_nodes), update ComfyUI |
| Distorted images, repeated details | Size doesn't match model (e.g., SD1.5 at 1024×1024) | Use the size the model was trained on; upscale later for larger images |
| Results don't change when clicking Run again | Fixed seed and nothing else changed | ComfyUI only reruns changed parts; change seed or set to randomize |
Useful startup parameters for low-end machines (per the official Troubleshooting page, used when running via command line):
python main.py --lowvram              # Low VRAM
python main.py --preview-method none  # Disable previews to save VRAM
python main.py --reserve-vram 2       # Reserve 2 GB VRAM for the OS
python main.py --cpu                  # CPU only – very slow, last resort
On the Desktop version, these parameters are set in the Startup Args section of each installation.
12. Next Steps
Once you've created your first image, here is a logical learning path:
- Understand model types: read Difference between LoRA and Checkpoint, then try adding a Load LoRA node between Load Checkpoint and the subsequent nodes.
- Write better prompts: How to write effective AI image prompts for SDXL and Flux.
- Choose more powerful models: Overview of Open-Source AI Image Models 2026 – then open the corresponding template in ComfyUI.
- Create consistent characters: How to train AI character LoRAs.
- Learn image-to-image, inpaint, upscale, ControlNet via official templates and the ComfyUI examples page.
When you need to integrate image generation into a product: maintaining a machine running ComfyUI 24/7 requires operational effort. At that point, using an Image Generation API with built-in queue infrastructure and multiple workers is a sensible choice. You can use the image generation API at Lumina (see SDG's AI Image Generation API service and the post Integrating AI Image APIs into websites) or contact us for a consultation on bringing your custom workflow into a product.
13. Frequently Asked Questions (FAQ)
Is ComfyUI free? Yes. ComfyUI is open-source software under the GPL-3.0 license, running for free on your machine. Note that Comfy Cloud and nodes calling third-party APIs may charge based on those services.
Can I use it without a dedicated graphics card?
It can run on a CPU (--cpu) but is very slow. Mac M chips use Metal acceleration. If your machine is weak, consider Comfy Cloud or an image generation API.
Do I need to know how to code? No. You just drag, connect nodes, and adjust parameters. The command line is only needed if you choose manual installation.
Does ComfyUI support Vietnamese? The interface supports language changes in Settings; the list of languages depends on the version. Prompts for models like SD1.5 should be written in English for the best results.
Where are images saved?
In the ComfyUI/output folder of your installation, and they also appear in the Media Assets panel.
Can I share models with A1111/Forge?
Yes – configure the extra_model_paths.yaml file (renamed from the existing .example file).
Why are nodes red when I open someone else's workflow? Those are custom nodes you haven't installed. Open ComfyUI-Manager to install the missing nodes, then download the specific models required by the workflow.
Is there an official Docker image? No. Official documentation explicitly states that ComfyUI does not provide an official Docker image.
References
- Official Source Code: github.com/Comfy-Org/ComfyUI – README (installation, shortcuts, prompt syntax notes). The old path github.com/comfyanonymous/ComfyUI automatically redirects here.
- Official Documentation – System Requirements
- Official Documentation – Getting Started / First Generation
- Official Documentation – Text to Image Workflow
- Official Documentation – Comfy Desktop for Windows
- Official Documentation – ComfyUI-Manager and Manager Installation
- Official Documentation – Troubleshooting
- Comfy Desktop Download Page · Sample Workflow Library · ComfyUI Examples
- Illustrations: screenshots from the Comfy-Org/docs repository (GPL-3.0 license), content preserved, sources cited under each image.

Training image-generation models, building API infrastructure and turning AI ideas into working software.
About me →