How to Train AI Character LoRAs: From Data Preparation to Testing

You've created an AI character you love, but by the second image, the face looks different, the hairstyle is off, and the outfit has changed. This is the most common issue when creating comics, brand mascots, or virtual KOLs with AI. The most popular way to keep a character consistent across hundreds of images is to train a character LoRA.
This article covers everything from concepts to practice: what LoRA is, when to train, choosing a base model, hardware requirements, data preparation, writing captions, folder structure, tool installation, parameter tuning, monitoring the training process, testing in ComfyUI, and fixing common errors. The numbers in this article are starting reference points, not a one-size-fits-all formula. Every dataset will require a bit of trial and adjustment.
1. What is LoRA? Visual Explanation
LoRA (Low-Rank Adaptation) is a model fine-tuning technique introduced by Microsoft's research team in 2021 in the paper LoRA: Low-Rank Adaptation of Large Language Models. The original idea was for language models, later widely adopted by the community for image generation models like Stable Diffusion and Flux.
Simply put: instead of modifying all billions of parameters of the original model, LoRA keeps the original model frozen and only learns two small additional matrices (usually called A and B). When generating an image, the "difference" created by these two matrices is added to the original model.
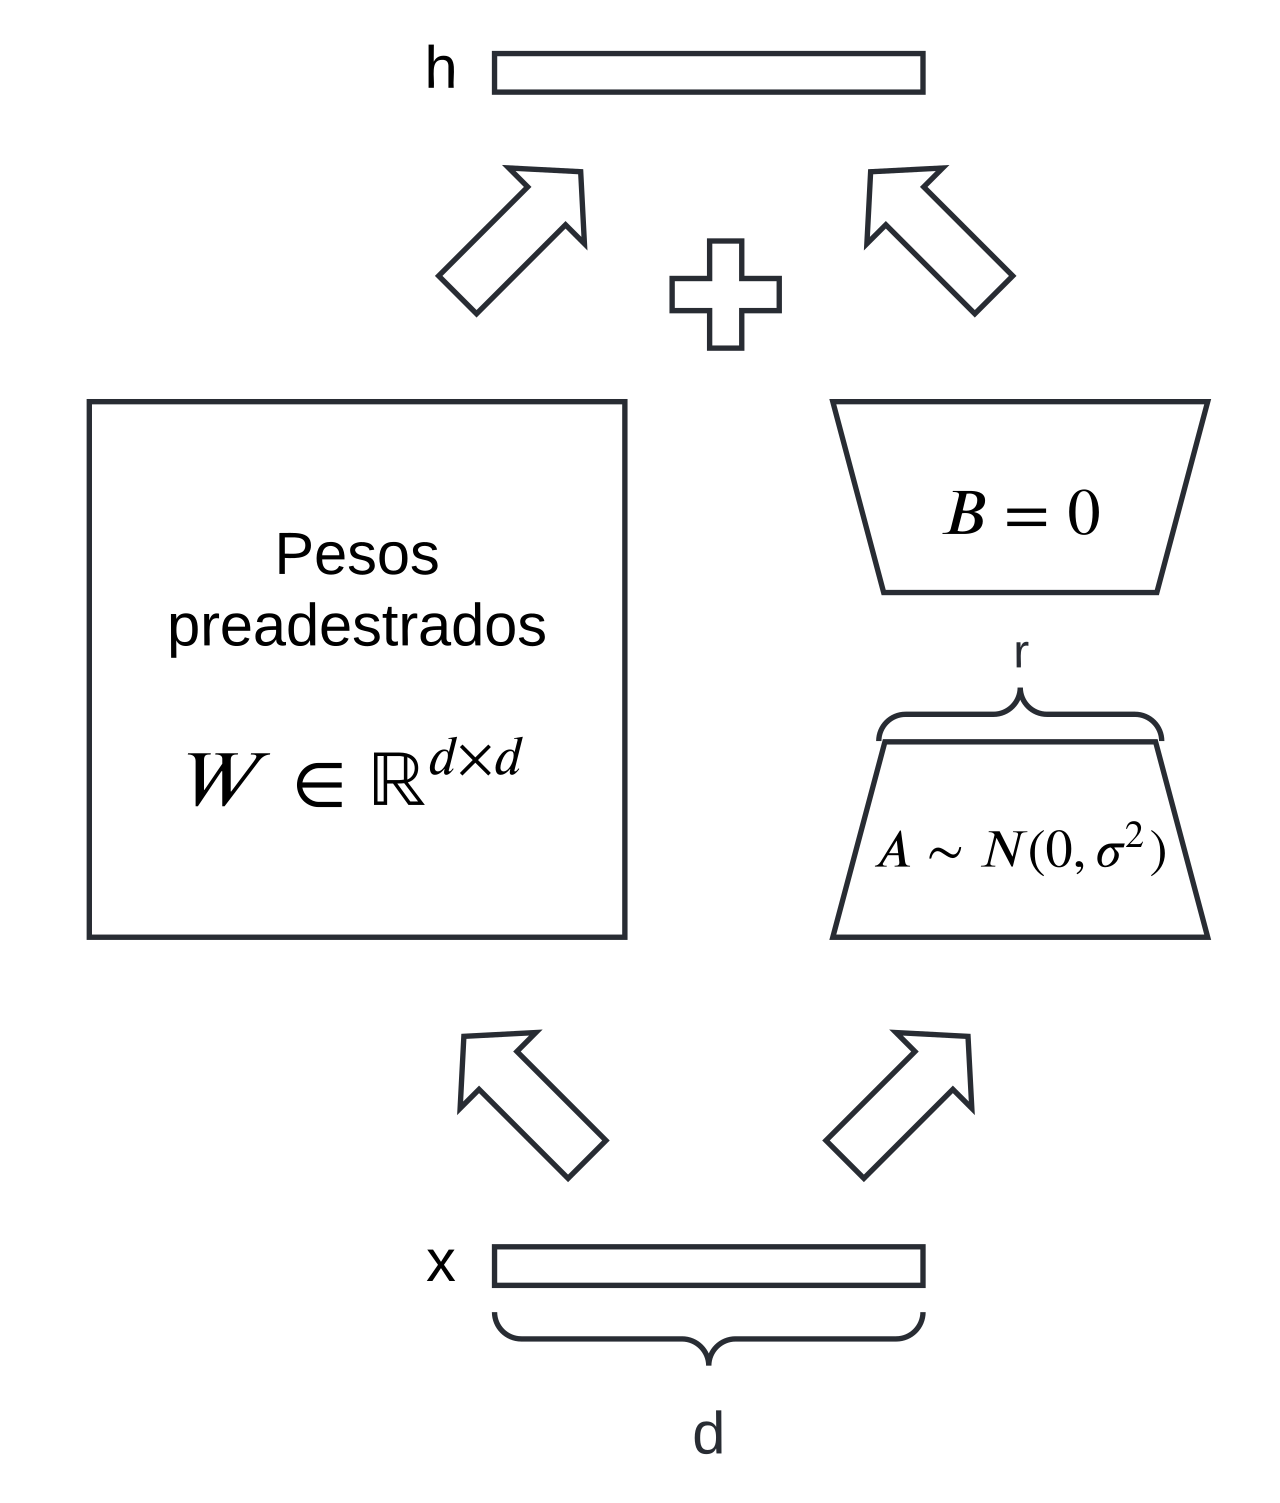 LoRA architecture diagram: original weights are frozen, only two low-rank matrices A and B are learned. Source: Wikimedia Commons – LoRA.svg, author LauAI, license CC BY-SA 4.0.
Why are two small matrices enough? A large matrix can be approximated by the product of two much "thinner" matrices. The number that determines this "thinness" is the rank, a parameter you will encounter in the configuration section. The higher the rank, the more "space" the LoRA has to remember details, but the file will be heavier and more prone to overfitting (memorization).
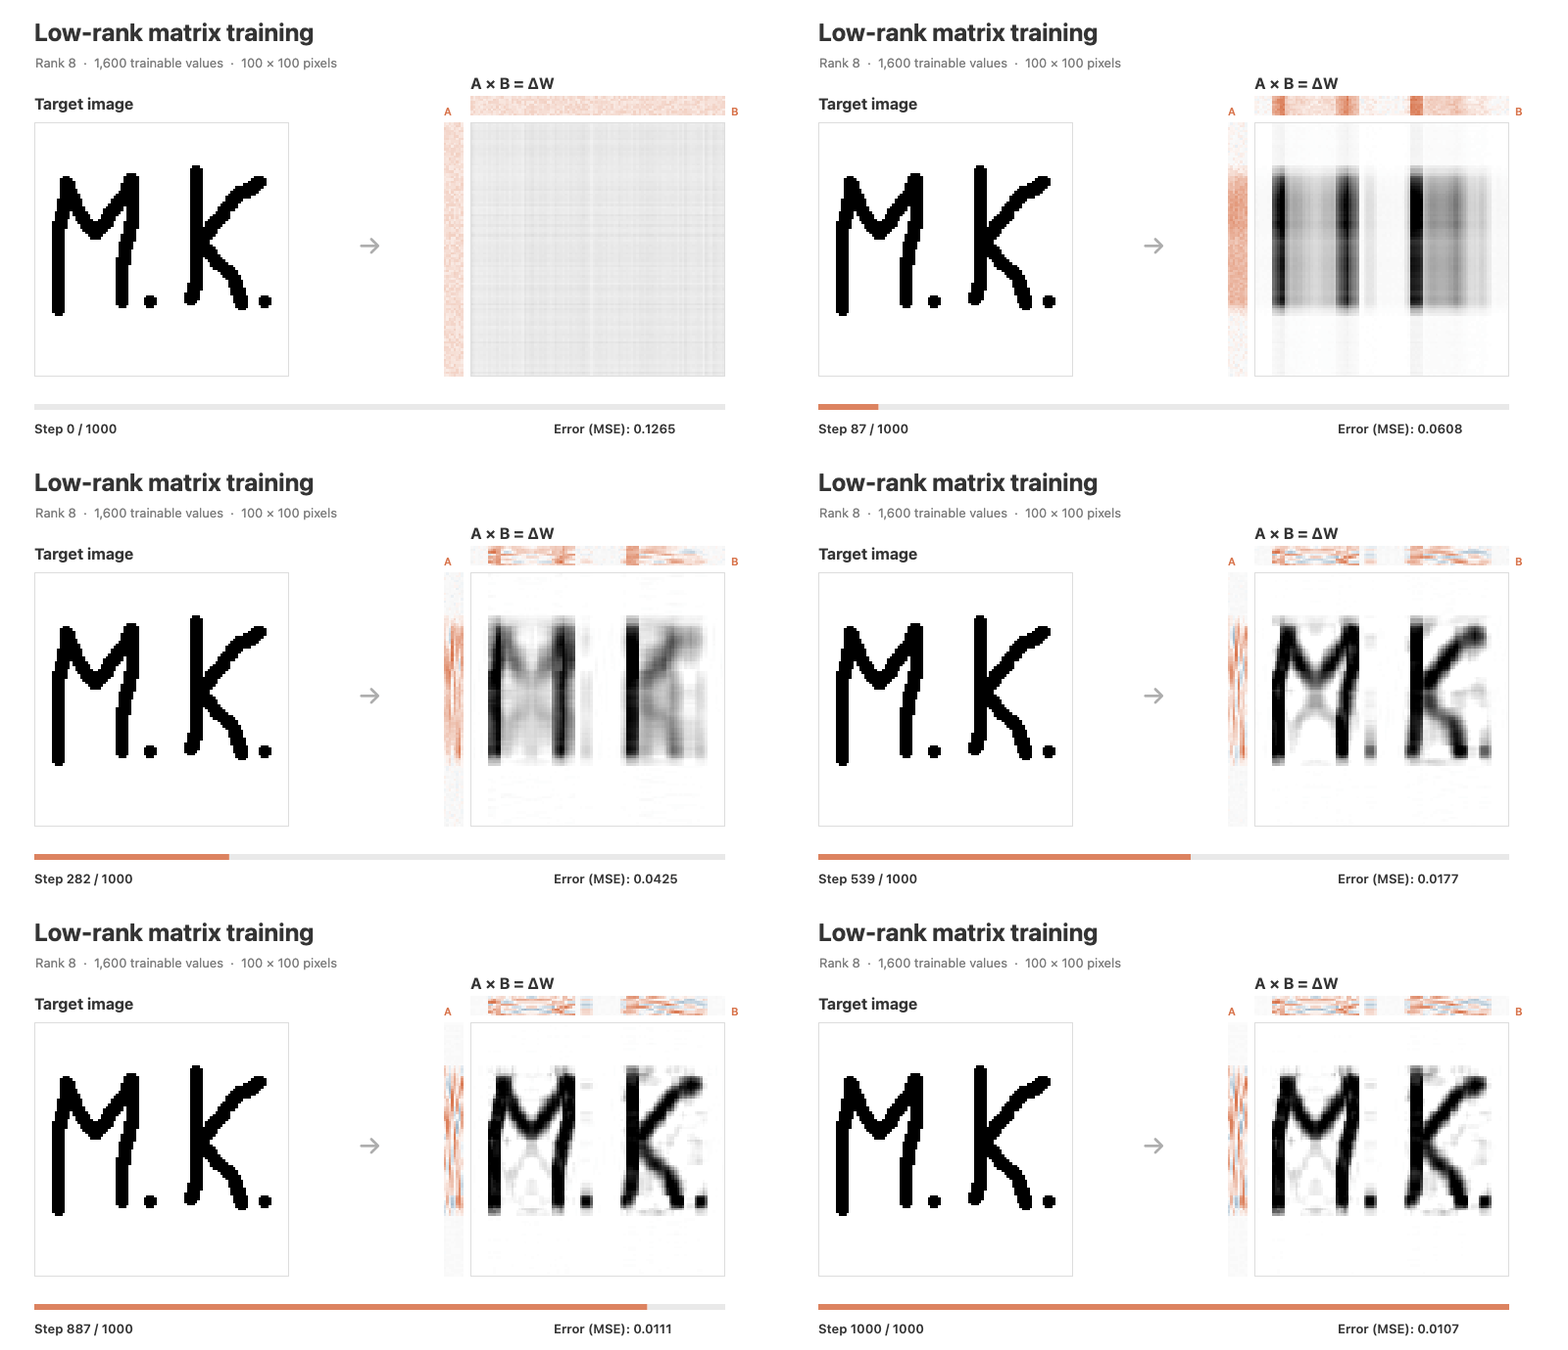 Low-rank matrix approximation illustration: a 100×100 matrix is gradually reconstructed by the product of two small matrices. Source: Wikimedia Commons, author Matejkoncal, license CC BY-SA 4.0.
Practical result: a character LoRA usually weighs only a few dozen to a few hundred MB (depending on the base model and rank), while the original checkpoint weighs several GB. You can turn the LoRA on, off, or adjust its strength every time you generate an image. If you're not sure how LoRA differs from a checkpoint, read more in the article How LoRA and Checkpoints Differ.
2. When Should You Train a Character LoRA?
Training a LoRA takes time for data preparation and testing, so it should only be done when truly necessary:
- Should train when you need the same character (mascot, comic character, virtual model) to appear in many different contexts, poses, and outfits while remaining instantly recognizable as the "same person."
- Should train when no matter how long or detailed your prompt is, you cannot maintain unique features like specific scars, eye colors, or signature hairstyles.
- Not necessary yet if you only need a few images. In that case, try writing very detailed prompts (see how to write effective AI image prompts) or use image reference tools like IP-Adapter.
- Should not train on real people's faces without their consent (see section 13).
3. Choosing a Base Model: SD1.5, SDXL, or Flux?
A LoRA is always tied to the model family it was trained on. A LoRA trained on SDXL cannot be used for SD1.5 or Flux. Therefore, choose your base model first.
| Base model | Common Training Resolution | Pros | Cons |
|---|---|---|---|
| SD 1.5 | 512×512 | Lightweight, fast training, abundant community resources | Lower quality and detail compared to newer generations |
| SDXL (and derivatives like Pony, Illustrious) | 1024×1024 | Good balance between quality and resources, large ecosystem | Requires more VRAM than SD1.5 |
| Flux (FLUX.1-dev and newer) | approx. 1024 | Excellent prompt adherence, detailed images, great face retention | Very heavy, requires a powerful GPU; note individual version licenses |
Practical suggestions:
- For anime characters or illustrations: choose an SDXL derivative checkpoint in the same style you will use for generation.
- For realistic characters needing complex prompt understanding: consider Flux, but read the license of the specific Flux version you use carefully, as some (e.g., FLUX.1-dev) have non-commercial licenses for weights. Whether the output can be used commercially needs to be checked directly on the model page.
- If you have a weak machine and want to learn the process first: start with SD1.5.
For an overview of available open models: see the article 2026 Open Source AI Image Model Landscape.
4. Hardware, VRAM, and Cloud Training Options
VRAM (graphics card memory) is the biggest limitation. The numbers below are common community references, not official specs. Actual levels depend heavily on optimizations like gradient checkpointing, 8-bit optimizers, latent caching, or model quantization:
- SD1.5: usually trainable on GPUs with about 6–8 GB VRAM.
- SDXL: usually needs about 12 GB or more to be comfortable; 8–10 GB can work with many optimizations enabled, but it will be slow.
- Flux: the sample configuration file for AI Toolkit is named
train_lora_flux_24gb.yaml, meaning it is designed for 24 GB GPUs. Smaller cards require quantization and memory-saving tricks.
NVIDIA cards are the best-supported option. The AI Toolkit README lists the requirement as "Nvidia GPU with enough ram." AMD cards or Mac Apple Silicon can run with some tools, but usually require more manual troubleshooting.
Don't have a powerful GPU? You can rent GPUs in the cloud. The kohya_ss README has instructions for running on Google Colab, Runpod, Novita, and Docker. AI Toolkit has instructions for Runpod and Modal. The advantage is no hardware investment. The disadvantage is having to upload data and manage rental time to avoid unexpected costs. If you don't want to do it yourself, see our LoRA Model Training Service.
5. Preparing the Character Dataset: The Most Important Step
There is a saying often repeated in the LoRA training world: good data is more important than good parameters. A messy dataset is hard to save no matter how much you tweak the settings.
5.1. How Many Images Do You Need?
There is no standard number in official documentation. Common community experience suggests:
- 15–30 high-quality images is a good start for a character.
- It can be done with about 10 images if they are excellent and diverse, but the LoRA will be less flexible.
- Over 50 images is not always better if many are repetitive.
5.2. Diversity of Angles, Expressions, and Outfits
The goal is for the model to understand what always stays the same (face, hair color, eye color) and what is allowed to change (pose, background, clothing). A balanced character dataset usually includes:
- Angles: front view, 3/4 view from both sides, profile view, and a few high-angle or low-angle shots.
- Framing: about 40–50% close-ups or bust shots for the model to learn the face well, with the rest being half-body and full-body shots.
- Expressions: smiling, serious, surprised, talking. If every image is a smile, the LoRA will struggle to create a serious character.
- Outfits and Backgrounds: at least 3–4 different outfits and various backgrounds. If 100% of the images feature the same jacket, the character will be "stuck" with that jacket (see section 12).
- Lighting: indoors, outdoors, warm and cool lighting.
5.3. Resolution and Cropping
- Original images should have a short edge at least equal to the training resolution: about 512 px for SD1.5, about 1024 px for SDXL and Flux. Smaller images that are upscaled will cause the LoRA to learn the blurriness.
- You are not required to crop into squares. kohya sd-scripts supports bucketing (grouping images by aspect ratio). The sd-scripts configuration documentation includes options like
enable_bucket,min_bucket_reso, andmax_bucket_reso. - Crop out unnecessary parts: black borders, text, watermarks, or other people in the frame.
- Save images as JPG or PNG. The AI Toolkit README states it only supports jpg, jpeg, png and notes that WebP "currently has issues."
5.4. Which Images are "Bad" and Should be Removed?
- Blurry, noisy, heavily compressed JPEGs, or low-resolution screenshots.
- Faces that are covered (by hands, sunglasses, hair) or too small in the frame.
- Images with watermarks, logos, text, or borders.
- AI-generated images with errors: extra fingers, distorted faces. The LoRA will learn the errors too.
- Nearly identical images (same angle, same expression, same clothes). Keep only 1–2.
- Images with filters or styles that are too different from the rest, unless you want the LoRA to learn that style as well.
6. Captions and Trigger Words
Each image is accompanied by a text file with the same name (e.g., image2.jpg and image2.txt) describing the image content. The AI Toolkit README clearly states this convention, and kohya also defaults to .txt (caption_extension).
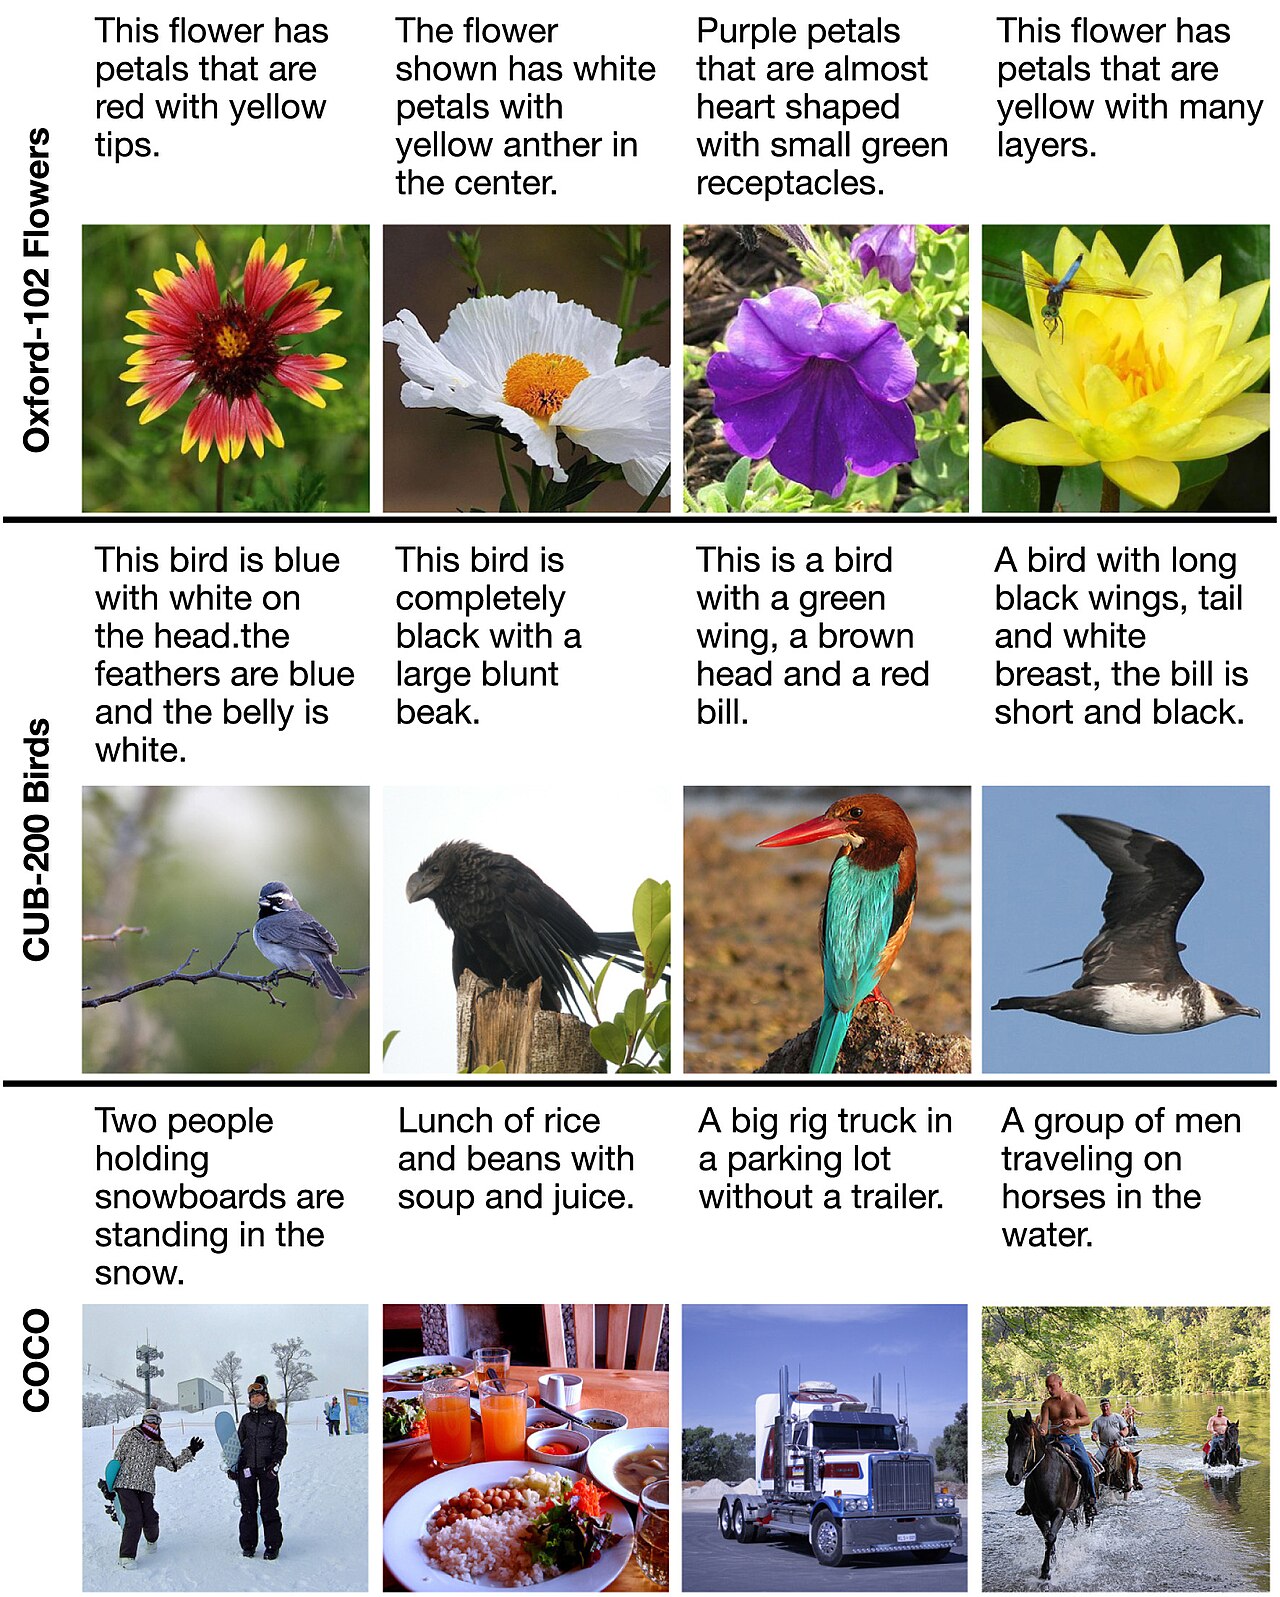 Example of image-caption pairs in popular image-text datasets; LoRA datasets follow the same "one description per image" principle. Source: Wikimedia Commons, authors Stanislav Frolov, Tobias Hinz, Federico Raue, Jörn Hees, Andreas Dengel, license CC BY 4.0.
6.1. Trigger Word
A trigger word is a "unique" word that the model doesn't know yet, such as mylinh_v1 or skzchar. This word is placed at the beginning of every caption. When generating an image, you type the trigger word to "call" the character. Avoid using existing words like celebrity names or generic terms like "girl." AI Toolkit allows you to write [trigger] in captions and automatically replaces it with the trigger_word from the config file.
6.2. The Golden Rule of Captioning
Describe what you want to be CHANGEABLE, ignore what is inherent to the character.
- If the character always has silver hair and blue eyes, don't write "silver hair, blue eyes" in every image. Let the trigger word "carry" those features.
- Explicitly describe the outfit, pose, background, expression, and camera angle, for example:
mylinh_v1, wearing red hoodie, sitting on a bench, park background, smiling, from side. This way, when generating, you can simply change "red hoodie" to something else.
6.3. Three Ways to Create Captions
- WD14 Tagger: Generates Danbooru-style tags (
1girl, solo, long hair, ...). Best for anime base models on SDXL or SD1.5. kohya_ss GUI has this tool built-in under the Utilities tab. - BLIP, Florence-2, or other VLM models: Generates natural language sentences. Best for Flux and realistic models that understand long sentences. The LoRA Ease interface for AI Toolkit has an "Add AI captions with Florence-2" button (see image in section 8).
- Manual Writing: The slowest but most accurate. A common practice is to let a tool auto-generate them first, then review each file to delete wrong tags and remove tags describing the character's fixed features.
Tip: sd-scripts has a keep_tokens option (keeps the first N tokens fixed when shuffle_caption is on). Setting keep_tokens = 1 ensures the trigger word always stays at the front.
7. Folder Structure (repeats_name)
With kohya_ss or sd-scripts using the traditional DreamBooth folder style, the subdirectory name follows the format <number of repeats>_<name>. The test set in the kohya_ss repo itself uses a folder named 10_darius kawasaki person, meaning each image is repeated 10 times per epoch, with the keyword "darius kawasaki" and class "person." Example:
lora_mylinh/
├── img/
│   └── 10_mylinh_v1 woman/
│       ├── 001.jpg
│       ├── 001.txt
│       ├── 002.png
│       └── 002.txt
├── model/      (where LoRA files are saved)
└── log/        (logs for viewing with TensorBoard)
If using the .toml configuration file for sd-scripts, the number of repeats is declared using num_repeats instead of being in the folder name. The documentation notes this parameter is equivalent to --dataset_repeats.
How are training steps calculated? Steps per epoch ≈ (number of images × repeats) ÷ batch size. For example, 20 images × 10 repeats ÷ batch 2 = 100 steps/epoch. Training for 10 epochs would result in about 1,000 steps.
8. Installing and Using Training Tools
There are two popular open-source tools, both with user-friendly licenses:
- kohya_ss (bmaltais/kohya_ss, Apache-2.0): A web interface (Gradio) for the kohya-ss/sd-scripts suite (Apache-2.0). Supports SD1.5, SDXL, and newer generations.
- AI Toolkit (ostris/ai-toolkit, MIT): Powerful for Flux and modern models, runs via YAML config files or a web interface.
8.1. kohya_ss Step-by-Step
- Install Python and git, along with the latest NVIDIA drivers.
- Clone the repo:
git clone https://github.com/bmaltais/kohya_ss.git. - Install according to the official instructions for your OS. The README offers 4 ways:
uvorpipfor Windows and Linux (macOS usespip). The documentation saysuvis faster and isolates libraries better. - Run the interface:
gui.baton Windows or./gui.shon Linux. If running on a server, you can use--listen 0.0.0.0 --server_port 7860 --headless. - Open your browser to the address shown in the terminal, select the LoRA tab, fill in the base model path, image folder, and output folder, adjust parameters (section 9), and click Start training.
If you prefer the command line, the original sd-scripts runs like this (shortened from train_network.md documentation):
accelerate launch --num_cpu_threads_per_process 1 train_network.py \
  --pretrained_model_name_or_path="<model_path>" \
  --dataset_config="my_dataset_config.toml" \
  --output_dir="<output_folder>" --output_name="my_lora" \
  --save_model_as=safetensors --network_module=networks.lora \
  --network_dim=16 --network_alpha=1 --learning_rate=1e-4 \
  --optimizer_type="AdamW8bit" --lr_scheduler="constant" --sdpa \
  --max_train_epochs=10 --save_every_n_epochs=1 \
  --mixed_precision="fp16" --gradient_checkpointing
Note: This script is for SD1.x/2.x. sd-scripts has separate scripts for SDXL and other lines, such as sdxl_train_network.py.
8.2. AI Toolkit Step-by-Step
- Requirements per README: Python ≥ 3.10 (3.12 recommended), NVIDIA GPU, venv, git.
- Install:
git clone https://github.com/ostris/ai-toolkit.git, create a venv, thenpip install -r requirements.txt(install PyTorch as instructed in the README). - Copy the sample file
config/examples/train_lora_flux_24gb.yamlto theconfigfolder, rename it, and edit according to the comments (dataset path,trigger_word, number of steps...). - Run:
python run.py config/your_file.yml. - Alternatively, use the AI Toolkit web interface. If exposing the interface to the network, the README recommends setting the
AI_TOOLKIT_AUTHvariable as a password.
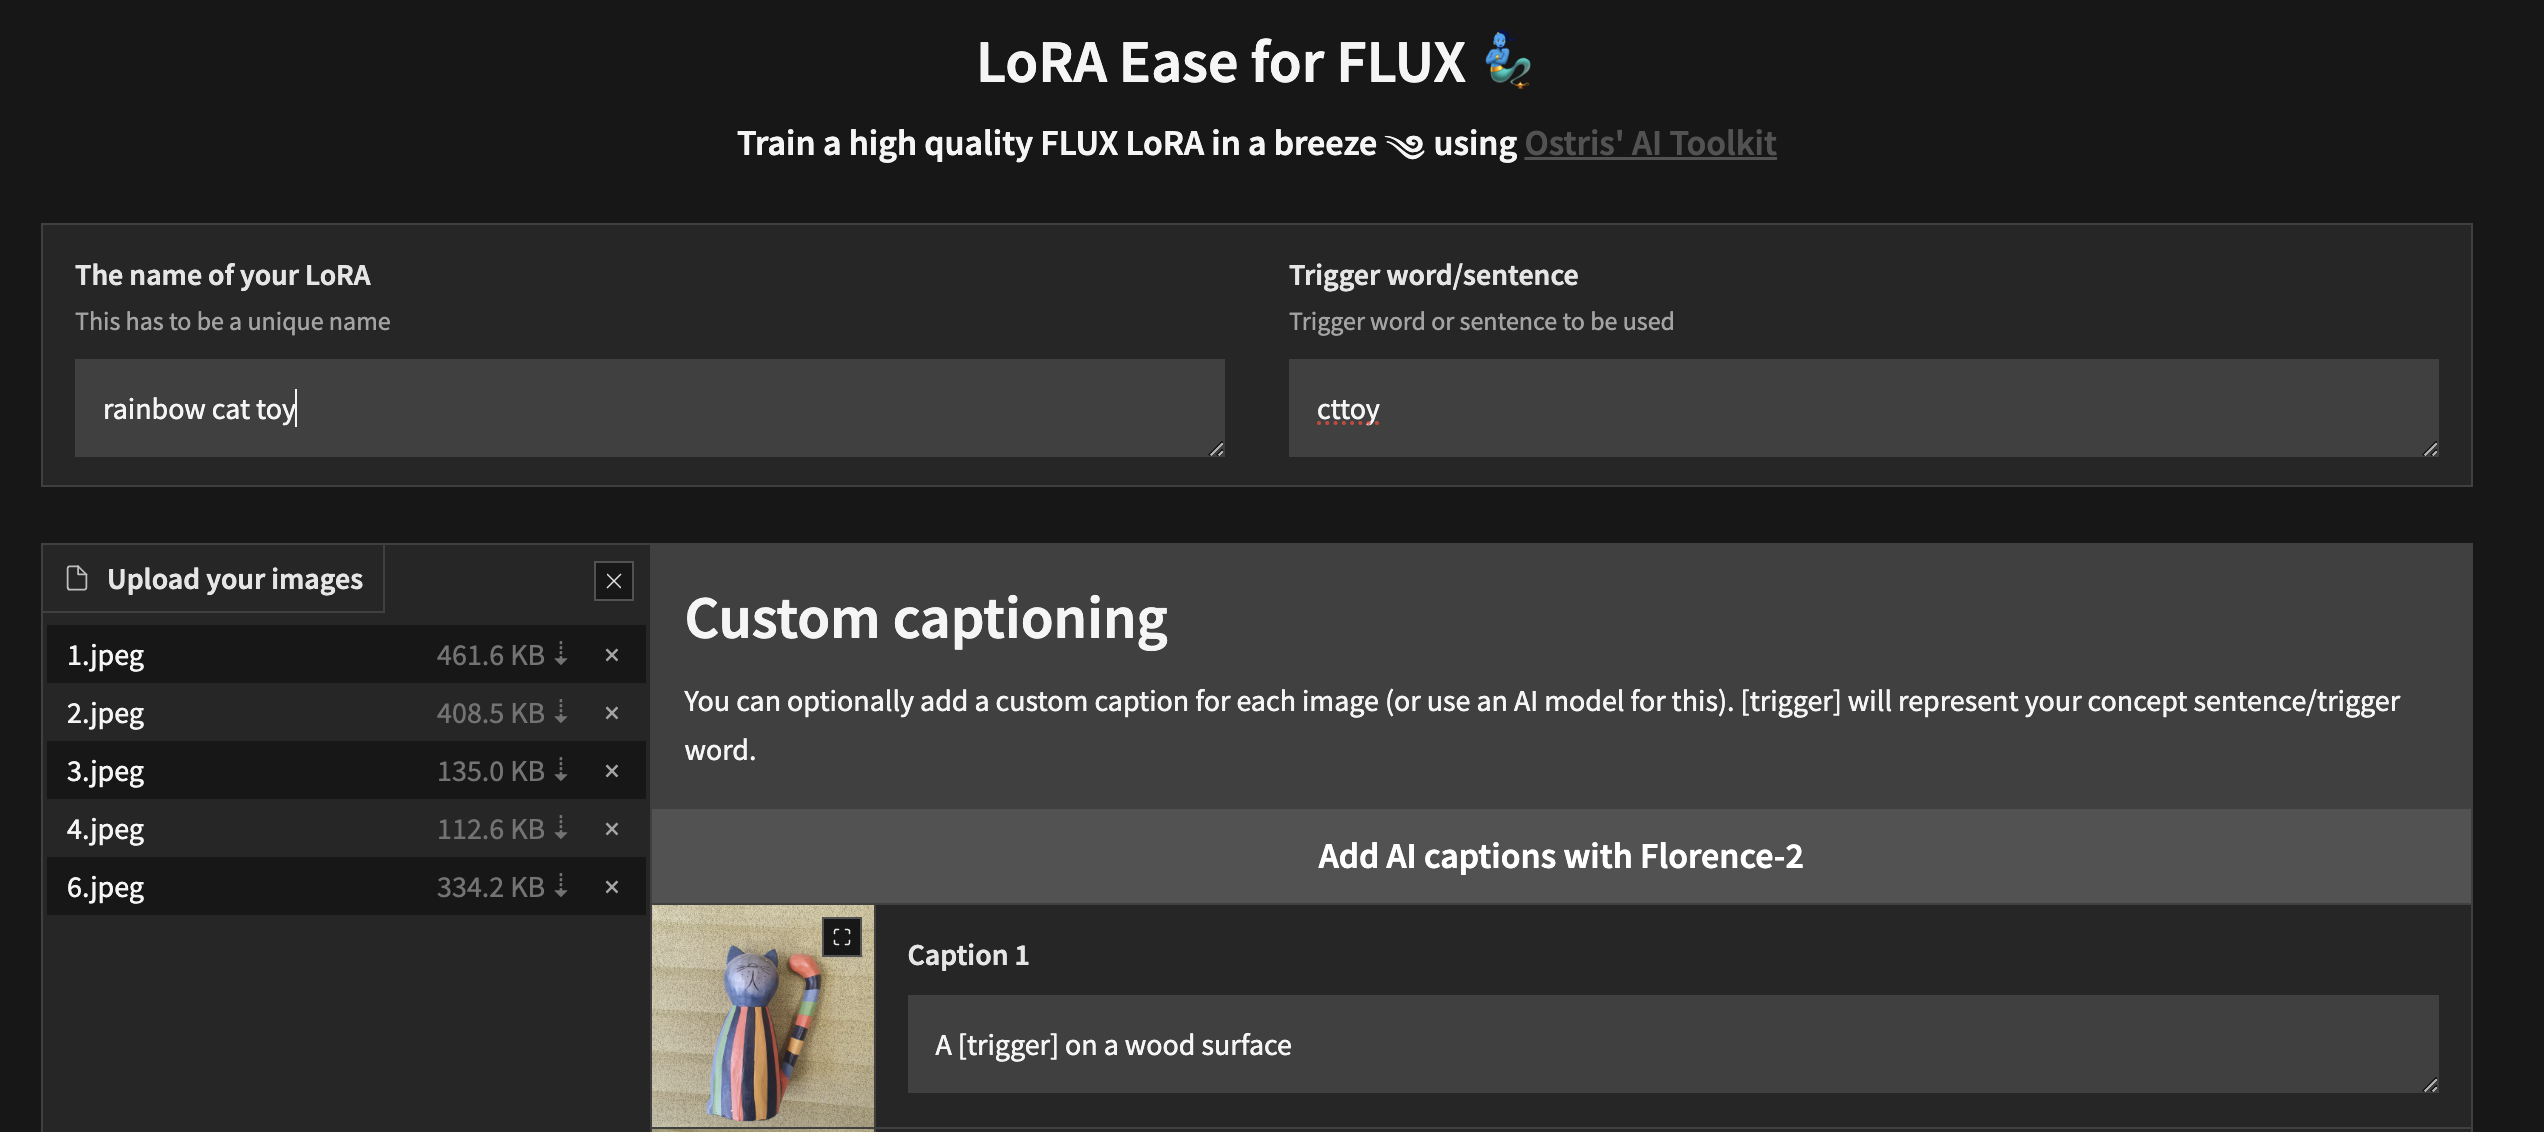 LoRA Ease interface (based on AI Toolkit): set LoRA name, trigger word, upload images, and write captions, with a button to auto-generate captions using Florence-2. Source: ostris/ai-toolkit – assets/lora_ease_ui.png, MIT license.
9. Easy-to-Understand Parameter Table
The suggested values below are common starting points for character LoRAs. Quotes from kohya sd-scripts documentation are noted.
| Parameter | Simple Meaning | Starting Suggestion |
|---|---|---|
Rank (network_dim) |
The "memory capacity" of the LoRA. Higher means more detail, but larger files and more prone to overfitting | 16–32 for characters. For example, kohya documentation uses 16 |
Alpha (network_alpha) |
Scaling factor, affects the "strength" of learning. Low alpha relative to rank is equivalent to lowering the learning rate | kohya docs: usually about half of network_dim, or equal to it |
| Learning rate (LR) | Speed of learning per step. Too high "burns" the image, too low and it won't learn | kohya example: 1e-4. Text encoder should be lower than U-Net (per docs) |
| Epochs | Number of times the entire dataset is processed (including repeats) | 10–20, save every epoch to choose later |
| Steps | Total steps = epochs × (images × repeats ÷ batch). If max_train_epochs is set, it takes priority over max_train_steps |
Characters usually fall between 1,000–3,000 steps (community reference) |
| Batch size | Number of images processed at once. Larger is faster but uses more VRAM | 1–2 if VRAM is limited |
| Optimizer | Weight update algorithm. kohya docs list AdamW8bit, AdamW, Lion, DAdaptation, Adafactor | AdamW8bit (saves VRAM, needs bitsandbytes). Prodigy or DAdaptation auto-adjust LR; when used, LR is usually set to 1 |
| Resolution | Image size during training | 512 (SD1.5), 1024 (SDXL, Flux) |
| Mixed precision | Calculating with 16-bit numbers for speed and lightness | fp16, or bf16 if the card supports it (RTX 30xx and up) |
| Save every N epochs | Saves a LoRA file after every N epochs | 1, to compare and choose the best epoch |
Two VRAM-saving options should be enabled: --gradient_checkpointing and latent caching. Both are in the example commands or sd-scripts documentation.
10. Monitoring Training and Sample Images
Don't wait until training is finished to see the results. There are two ways to monitor:
- Sample Images: sd-scripts supports
--sample_prompts(a prompt file) and--sample_every_n_stepsor--sample_every_n_epochs. After each milestone, the tool automatically generates a few test images with the current LoRA. AI Toolkit also has asamplesection in the config file. Write 3–4 diverse sample prompts: close-up, full-body, outfits completely different from the dataset, different styles. - Loss (TensorBoard): Loss is an error metric, but with diffusion models, it fluctuates a lot and does not accurately reflect quality. Use it to detect anomalies (Loss = NaN, sudden spikes), but the primary evaluation should be visual.
Signs to stop early: Sample images already look like the character but start to look stiff, colors become harsh, or the background and outfit always match the dataset. That's when the model starts overfitting.
11. Testing LoRA in ComfyUI and Choosing the Best Epoch
When training is done, you'll have multiple files like my_lora-000004.safetensors, my_lora-000008.safetensors... Each file is the state after a certain number of epochs. How to test:
- Copy the files to the
models/lorasfolder of ComfyUI. If you're new to ComfyUI, see What is ComfyUI – A Beginner's Guide. - Add a Load LoRA node between the Load Checkpoint node and the rest of the workflow. Select the LoRA file, adjust
strength_modelandstrength_clip(start at 0.8–1.0). - Fix the seed and use the same set of prompts, then swap each epoch file and strength level one by one. This way, only one variable changes, allowing for a fair comparison.
- Arrange the results in a grid (XY plot) as shown below for easy viewing.
 Example XY plot grid: same prompt and seed, only one parameter changed (here, sampling steps). When choosing a LoRA, you would change the epoch or strength similarly. Source: Wikimedia Commons, image created with Stable Diffusion WebUI, Public domain.
How to choose the epoch? A good LoRA should meet 4 criteria: (1) instantly recognizes the character, (2) can change outfits and backgrounds according to the prompt, (3) works at 0.7–0.9 strength without breaking, (4) can be combined with other style LoRAs. Usually, the best epoch is found between the middle and 2/3 of the training process, not the final epoch.
12. Common Errors and How to Fix Them
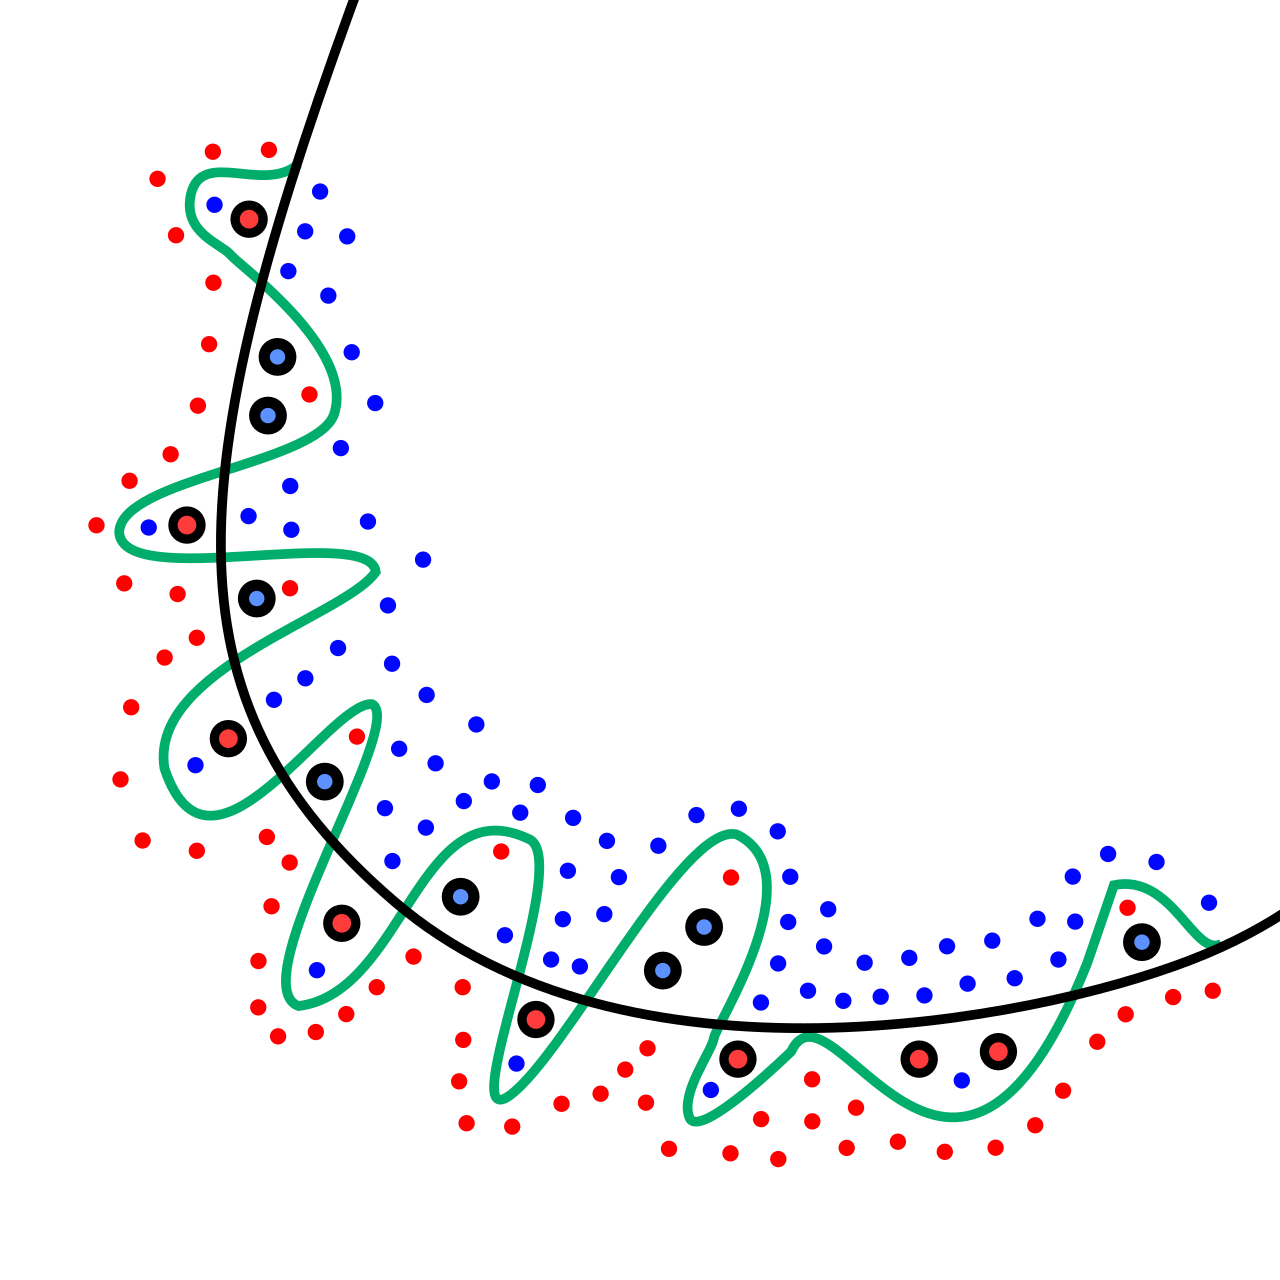 Overfitting illustration: the green line follows every training data point, while the black line is more generalized. An overfitted LoRA "memorizes" training images instead of understanding the character. Source: Wikimedia Commons – Overfitting.svg, author Chabacano, license CC BY-SA 4.0.
| Symptom | Possible Cause | Fix |
|---|---|---|
| Overfit: Stiff images, harsh colors, always outputs the same pose/background as the dataset, prompts are ignored | Too many steps, LR too high, rank too large, dataset lacks diversity | Choose an earlier epoch, reduce LR or repeats, lower strength to 0.6–0.8, add diverse images |
| Underfit: Doesn't look like the character, trigger word has no effect | Too few steps, LR too low, captions describe fixed features too specifically | Train more epochs, increase LR slightly, remove fixed feature tags from captions |
| Face loss / unstable face | Too few close-ups, face too small in full-body shots, blurry images | Add clear close-ups (approx. 40–50% of dataset), remove blurry images. Use a face fix step (FaceDetailer) when generating full-body shots |
| Outfit stuck to character | Most images feature the same outfit, captions don't mention the outfit | Add images with different outfits; explicitly name the outfit in captions so the model understands it's "detachable" |
| Style bleeding (LoRA makes all images look like the source art) | Dataset shares the same art style or filter | Diversify image sources, or describe the style in captions |
| Out of VRAM (CUDA out of memory) | Batch, resolution, or rank too large | Reduce batch to 1, enable gradient checkpointing, use AdamW8bit, cache latents; use quantization for Flux |
| Loss is NaN, black images | LR too high, precision error | Reduce LR, try switching fp16 to bf16 |
13. Copyright and Ethics When Training Real Human Faces
This part is just as important as the technical side:
- Only train real human faces with the explicit consent of that person, preferably in writing, stating the purpose of use. Personal images are personal data. In Vietnam, the Civil Code has regulations on individual image rights, and there are regulations on personal data protection. Consult a lawyer for specific cases. This article is not legal advice.
- Do not create fake, pornographic, defamatory, or fraudulent content using someone else's face (deepfakes). Many platforms and countries have banned or penalized this behavior.
- Images used for training also have copyrights. Images taken from the web, another artist's work, or commercial characters may involve copyright issues, especially if used for commercial purposes.
- Check the base model license. Some models have licenses restricting commercial use or have responsible use terms.
- Transparency: When posting AI-generated content, especially characters that look like real people, clearly state that it is an AI image.
14. Frequently Asked Questions (FAQ)
How long does it take to train a character LoRA? It depends on the GPU, base model, and number of steps. With SD1.5 or SDXL on a mid-range GPU, it usually takes from a few dozen minutes to a few hours. Flux takes longer. This is a general estimate, not a specific measurement.
Can I train on a laptop? Yes, if the laptop has an NVIDIA GPU with enough VRAM (see section 4). If not, use Colab or rent a cloud GPU.
Can an SDXL LoRA be used for other SDXL models? Usually yes, with checkpoints from the same family, but results are best when used close to the trained base. SDXL LoRAs cannot be used for SD1.5 or Flux.
What rank should I use? For characters, 16–32 is a commonly used range. A higher rank is not automatically better.
Do I need regularization images (class images)? Not mandatory. Regularization images help maintain the model's ability to generate "generic people," but they increase training time. Many character trainers do not use them.
Can I use multiple LoRAs at once? Yes, but you should lower the strength of each LoRA so they don't "fight" each other.
What if I don't want to do it myself? You can check out Sydigi's LoRA Model Training Service.
Related Articles
- How LoRA and Checkpoints Differ
- How to Write Effective AI Image Prompts
- What is ComfyUI – A Beginner's Guide
- LoRA Model Training Service
References
- Hu et al., LoRA: Low-Rank Adaptation of Large Language Models, arXiv 2021.
- kohya-ss/sd-scripts – docs/train_network.md and config_README-en.md (Apache-2.0).
- bmaltais/kohya_ss – README (Apache-2.0).
- ostris/ai-toolkit – README (MIT).
- Hugging Face Diffusers – LoRA Documentation.
- microsoft/LoRA (MIT).
- Images: Wikimedia Commons (CC BY-SA 4.0, CC BY 4.0, Public domain) and ostris/ai-toolkit (MIT), sources credited under each image.

Training image-generation models, building API infrastructure and turning AI ideas into working software.
About me →